DIMENSIONS
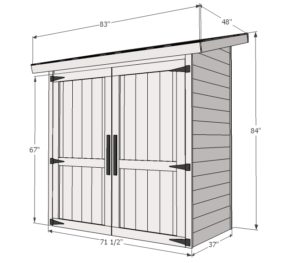
Dimensions are shown above
PREPARATIONS
SHOPPING LIST
- 18 – 2×2 @ 8 feet long
- 44 – 5 1/2″ wide cedar fence pickets
- 1 – 2×4 @ 8 feet or stud length
- 4 – 1×3 @ 8 feet long
- 8 – 1×4 @ 8 feet long
- 1 – 4×8 sheet of plywood for attaching roofing shingles (check what the manufacturer of your shingles recommends)
- 30 square feet of roofing shingles
- Roofing nails or glue
- Heavy-duty gate hinges, Handles, Lock or Catch
CUT LIST
BACK WALL
- 2 – 2×2 @ 66 1/2″
- 5 – 2×2 @ 77”
- 16 – 5 1/2″ wide x 1/2″ thick fence pickets @ 66 1/2″ long
SIDEWALLS
- 2 – 2×2 @ 35 1/2″
- 2 – 2×2 @ 77 1/2″ (longest point, top end cut at 15 degrees off square)
- 2 – 2×2 @ 72 5/8″ (longest point, top end cut at 15 degrees off square)
- 2 – 2×2 @ 67 1/2″ (shortest point, top end cut at 15 degrees off square)
- 2 – 2×2 @ 36 7/8” (long point to short point, both ends cut at 15 degrees off square, parallel to each other)
- 32 – 5 1/2″ wide x 1/2″ thick fence pickets @ 35 1/2″ long
- 2 – 1×3 @ 80 1/2″
- 2 – 1×3 @ 70 1/4″ (short point measurement, top edge beveled at 15 degrees off square)
FRONT HEADER
- 1 – 2×4 @ 66 1/2″
ROOF
- 2 – 1×4 @ 83”
- 2 – 1×4 @ 46 1/2″
- 5 – 2×2 @ 46 1/2″
- 1 – roofing plywood @ 83” x 48”
DOORS*
- 4 – 1×4 @ 60”
- 4 – 1×4 @ 33”
- 2 – 1×4 @ 26”
- 12 – 5 1/2″ wide x 1/2” thick fence pickets @ 67”
*You may wish to build doors slightly shorter to enable easier opening and closing – recommended to build doors to fit finished opening.
INSTRUCTIONS
STEP 1
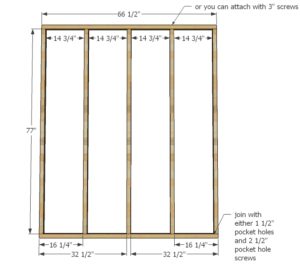
Frame you your back walls. You can use the Kreg Jig or 2 1/2″ screws here.
STEP 2
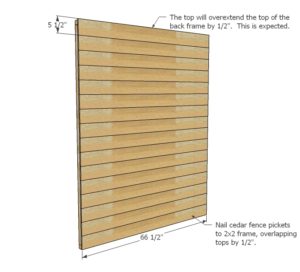
Starting at the bottom and working upward, attach the cedar fence pickets, overlapping 1/2″ as you go up. Screw or nail and glue on.
STEP 3
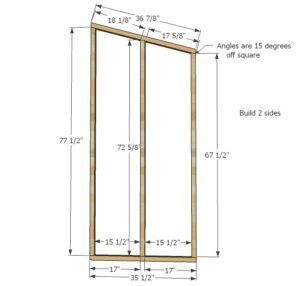
Frame side walls as shown in the diagram.
STEP 4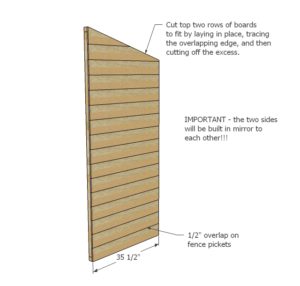
And add the cedar siding to the back wall as shown in the diagram. Do not forget that the sides need to be done in the mirror!diagram as you did the back wall. You will need two side walls.
STEP 5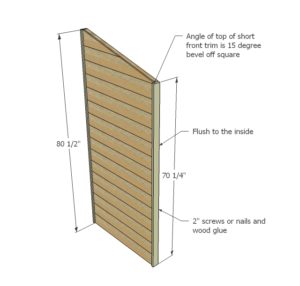
Build the sidewalls and attach cedar fence pickets to the sidewall.
STEP 6
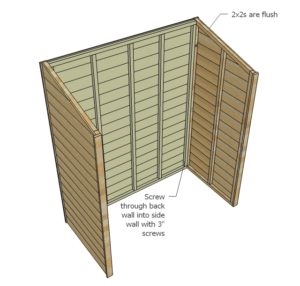
Once your side walls are complete, you can attach back walls. Use 2 1/2″ screws or brackets for easy disassembly.
STEP 7
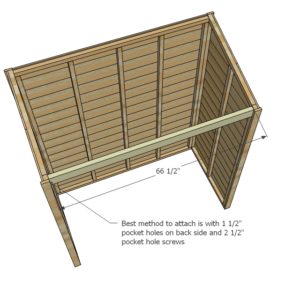
Add a header to front of the shed. Take a minute here to make sure your project is square. The door area especially needs to be square.
STEP 8
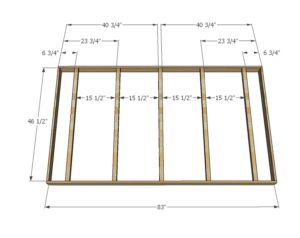
Frame up roof as shown above.
STEP 9
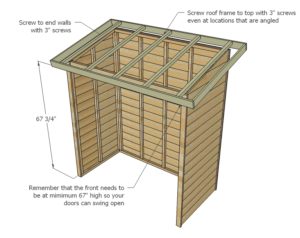
And attach the roof to top of storage shed.
STEP 10
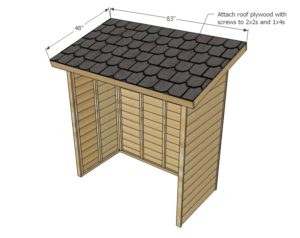
Add plywood and roofing to top of the shed.
STEP 11
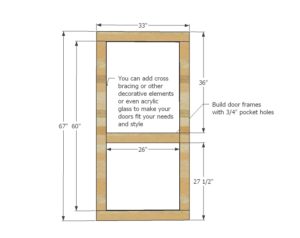
Frame doors up with pocket holes. Build doors to fit your openings. I like to leave 1/8″ gaps.
STEP 12
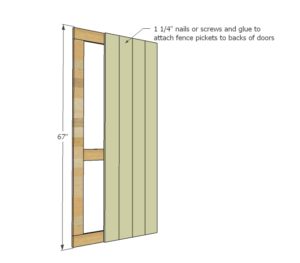
Attach cedar fence pickets to the back of doors.
STEP 13
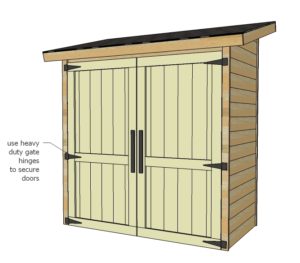
And then install doors to shed.
FINISHING INSTRUCTIONS
Fill all holes with wood filler and let dry. Apply additional coats of wood filler as needed. When wood filler is completely dry, sand the project in the direction of the wood grain with 120 grit sandpaper. Vacuum sanded project to remove sanding residue. Remove all sanding residue on work surfaces as well. Wipe project clean with a damp cloth.
It is always recommended to apply a test coat on a hidden area or scrap piece to ensure color evenness and adhesion. Use primer or wood conditioner as needed.
CREDIT ANA WHITE
