DIMENSIONS
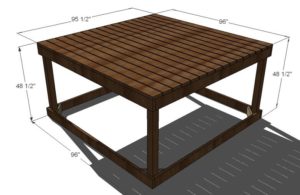
Overall Dimensions for the basic platform is shown above. To make the swingset arm, you will need to review the dimensions from the first drawing. The composition is wood boards, painted and sealed for outdoor use. If you are not using the base unit for a sandbox (would make great toy storage!) then I recommend using treated lumber for the 4×4 posts and what would have been the sandbox sides. I was just talking with my husband’s uncle about using wood composite decking instead as it would last much longer, but is much more expensive. One of the factors is to consider the number of years the playhouse will be used and then choose your lumber accordingly. Paint on boards properly maintained in a dry location could last your kids into college.
PREPARATION
- 2 – 4×4 Posts 8′ Long (3 if you are using the swingset option)
- 29 – 2×6 Boards, 8′ Long (8 of these can be stud length 92 5/8″ if stud length is cheaper)
- 4 – 2×4 @ 8 feet long (use for cross bracing)
- 2-1/2″ Exterior Self Tapping Deck Screws
- 2″ Exterior Self Tapping Deck Screws
- Outdoor Paint or Stain
- 4 – 4×4 Posts @ 47″ (OR 2 @ 47″ and 2 @ 96″ for the swingset option)
- 8 – 2×6 @ 92 1/2″ (Shorter Sides)
- 4 – 2×6 @ 96″ (Longer Sides)
- 8 – 2×6 @ 12″ (Diagonal Supports, both ends mitered down 45 degrees)
- 16 – 2×6 @ 96″ (Deck Boards)
INSTRUCTIONS
STEP 1
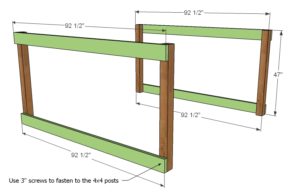
Sides { Part 1 } Lay the 4×4 posts flat and attach the posts as shown above to the sides. Use 3″ screws. Also note that if you are building the swing arm, ONE of each of the posts on each side will be 96″ long.
STEP 2
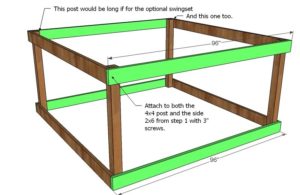
Sides { Part 2 } Now attach the remaining sides to the posts and sides as shown above. Use 3″ screws. Level the frame and adjust for square. Trust me, it will be a miracle if it’s square without adjustment.
STEP 3
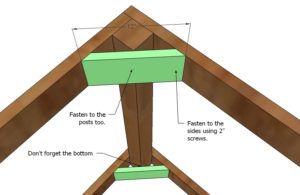
Diagonal Supports With the box nice and square and level, fasten the diagonal supports to each corner as shown above. This should stiffen up the corners considerably.
STEP 4
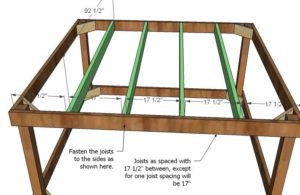
Joists Mark out all of your joists on the sides, (the long sides) as shown above. Then screw the joists to the sides as shown above. Use 3″ screws.
STEP 5
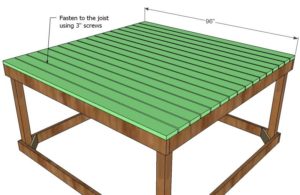
STEP 6
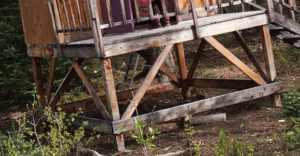
Cross brace the base with 2x4s as shown in the diagram, attaching with at screws into the framing.
FINISHING INSTRUCTIONS
CREDIT ANA WHITE
