2×4 bunk beds that look anything but! We love the modern look of these sturdy bunk beds. Built-in sections, it’s easy to move in and out of a room. There’s good reason this plan is a reader favorite.
You’ll love how easy and inexpensive they are to build! Our free step by step plans include diagrams, shopping list, and cut list.
DIMENSIONS
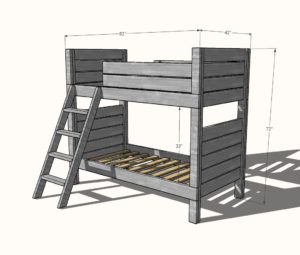
modern bunk bed dimensions.
PREPARATIONS
- 7 – 2×4 @ 8 feet long
- 6 – 2×6 @ 10 feet long
- 4 – 2×6 @ 8 feet long
- 2 – 2×2 @ 8 feet long
- 2 1/2″ self tapping wood screws for most of the joinery (about 150)
- If you have a brad nailer, 2″ brad nails would be nice to use in step 2
- 2″ self tapping wood screws for attaching the slats (about 50)
- Recommend using 32 – 3 1/2″ bolts with nuts and washers for attaching siderails to headboard/footboard
- You’ll also need wood to create the slat system if you mattress is not a “bunkie board”. We recommend 1×4 lumber, spaced about 4″ apart – you’ll need about 10 1×4 at 8 feet long.
- For each guardrail, you’ll need another 2×6 @ 8 feet long and about 3 feet of 2x4s
- For the ladder, you’ll need two more 2×4 @ 8 feet long
Bunk Bed Cut List
- 18 – 2×6 @ 36″
- 4 – 2×4 @ 72″
- 4 – 2×4 @ 18″
- 4 – 2×4 @ 33″
- 4 – 2×4 @ 10″
- 4 – 2×6 @ 82″
- 4 – 2×2 @ 75″
- Slats cut at 39″ or bunkie board
Guardrail Cut List (for one guardrail)
- 2 – 2×6 @ 48″
- 2 – 2×4 @ 16″
Ladder Cut List
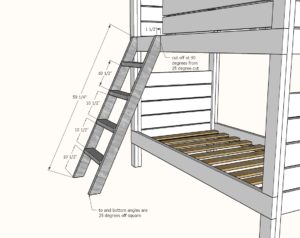
- 2 – 2×4 @ 59-1/4″ – long point to short point measurement, both ends cut at 25 degrees off square, ends ARE parallel
- 4 – 2×4 @ 17-1/2″
INSTRUCTIONS
STEP 1
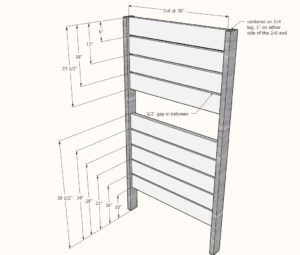
Build the two bunk bed ends by attaching the 2×6 @ 36″ to the 2×4 legs. There should be a 1/2″ gap in between the 2×6 slats, and 1″ on space on either side on the 2×4 legs.
We recommend two 2-1/2″ self tapping screws per joint to attach from the outside – don’t worry about it looking nice, this all gets covered.
STEP 2
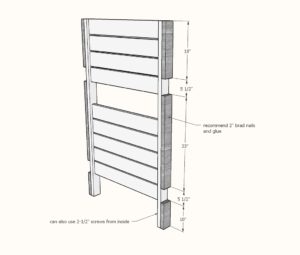
Once your ends are built, add the leg spacer trim pieces. Now this plan assumes your 2x6s are 5 1/2″ wide. I would use a scrap 2×6 piece as a spacer to make sure you are getting the right gaps for the next step. Start at the bottom and work your way up. TIP: Cut the top sections last as they may be long or short depending on the width of your 2×6 boards.
We recommend using 2″ brad nails and glue to attach, as the nails are easy to hide.
Sand, paint or stain the two end panels and your 2×6 @ 82″ siderails now.
Move the pieces into the room.
STEP 3
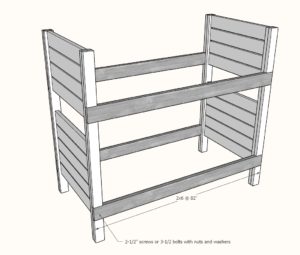
To assemble, drill four holes in pattern on each end of the siderails, through the legs. Attach with bolts and washers. This way, your bed can easily be taken apart and moved.
STEP 4
Screw 2×2 cleats to the inside of the siderail with 2-1/2″ screws and glue, screw about every 8-10″.
STEP 5
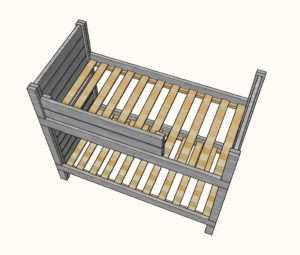
Optional Guardrail
Screw 2x6s to 2x4s from inside, leave a 1/2″ gap in between.
Screw guardrail to back side of the bed siderails.
STEP 6
Mattress slats – use 1x4s or similar laid on top of the 2×2 cleats to support the mattress. We recommend 2″ screws for keeping the slats secured.
Place the slats around the guardrail legs.
STEP 7
Cut the mattress legs at 25 degrees off square, long point to short point measurement, ends ARE parallel.
Then cut the top end off, 1-1/2″ back, at a 90-degree angle from the top angled cut end.
Use 2-1/2″ self-tapping wood screws to attach ladder rungs to the ladder legs.
Attach ladder from inside of the side rail with 2-1/2″ screws.
FINISHING INSTRUCTIONS
Fill all holes with wood filler and let dry. Apply additional coats of wood filler as needed. When wood filler is completely dry, sand the project in the direction of the wood grain with 120 grit sandpaper. Vacuum sanded project to remove sanding residue. Remove all sanding residue on work surfaces as well. Wipe project clean with a damp cloth.
It is always recommended to apply a test coat on a hidden area or scrap piece to ensure color evenness and adhesion. Use primer or wood conditioner as needed.
CREDIT ANA WHITE

