DIMENSIONS
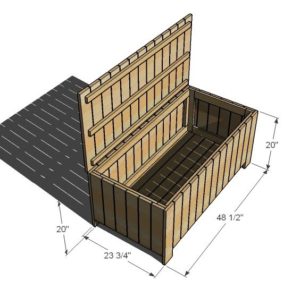
Overall Dimensions are shown above.
PREPARATIONS
- 15 – 1×4 Boards, 8′ Long
- 6 – 1×3 Boards, 8′ Long
- 2 – 1×2 Board, 8′ Long
- 2 Door Hinges for exterior use
- 1 1/4 inch screws
- 2-inch screws
- 1-1/4″ Pocket Hole Screws
- Elmer’s Wood Glue
- Elmer’s Wood Filler
- 120 grit sandpaper
- primer
- paint
- paintbrush
CUT LIST FOR SIDE PANELS
- 4 – 1×4 @ 20″ (Legs)
- 22 – 1×4 @ 17″ (Side Slats)
- 4 – 1×3 @ 45 1/2″ (Frame Boards, Top and Bottom)
- 4 – 1×2 @ 11 1/4″ (Frame Boards, Ends)
CUT LIST FOR END PANELS
- 12 – 1×4 @ 17″ (End Panel Slats)
- 4 – 1×3 @ 16 1/4″ (Frame for the ends)
- 4 – 1×3 @ 17 1/4″ (Frame for the tops and bottoms)
CUT LIST FOR THE BOTTOM
- 6 – 1×4 @ 47″ (Bottom)
CUT LIST FOR THE TOP
- 13 – 1×4 @ 23 3/4″ (Top Slats)
- 3 – 1×2 @ 45 1/2″ (Top Frame Supports)
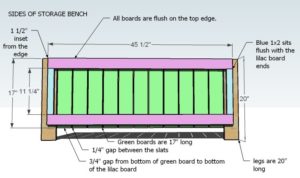
Build two side panels as shown above. The easiest way to do this would be to start with one of the legs. Mark the leg 1 1/2″ in (you could just use a 1×2 since it’s 1 1/2″ wide) from the outside. Then attach the pink board to the top corner, as shown above. The space a green board 1/4″ from the leg and attach to the pink board. For now, I would just use 1 screw. Attach all of the green boards and the remaining leg to the top pink board. Then carefully adjust all of the boards until the outside corners of the legs are square with each other. Then add the blue boards to the legs, and then the remaining pink boards. Go back and add more screws to the top frame board. Use 1 1/4″ screws and glue. Build two side panels.
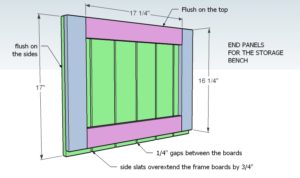
The end panels are going to be super simple. Start by screwing a blue board to a green board to create your ends. Then lay your all of the green boards down, including the two with the blue boards screwed to the tops, and lay the pink boards on top. Screw the pink boards to the green boards using 1 1/4″ screws and glue. Make sure you are checking for square and there is a 3/4″ gap under the bottom pink boards. All other outside edges are flush. You will need to construct two end panels.
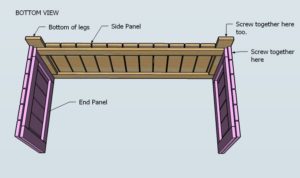
When your panels are complete, attach the panels as shown above. Use 2″ screws and you can skip the glue if you plan to disassemble at some point.
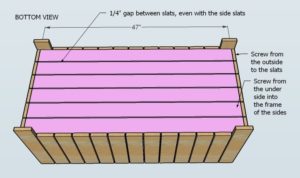
Attach the bottom boards as shown above using 2″ screws. Use glue if you want a stronger more permanent joint, no glue if you wish to disassemble at some point.
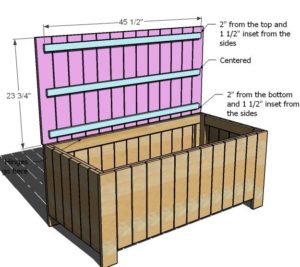
STEP 6
FINISHING
You probably already finished the pieces (or at least each panel) so just add paintable silicone to any exposed screws or imperfections, lightly sand, and apply touch up coat. You may also wish to spray on a clear coat for added protection from the elements.
CREDIT ANA WHITE
