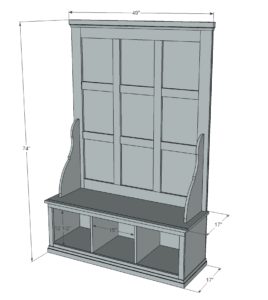
Free plans to build a Farmhouse Hall Tree. Step by step plans includes a shopping list, cut list, and detailed diagrams to help you build your own hall tree.
- 1 sheet ¾” plywood ripped into strips 15 ¾” wide (referred to as 1×16 in the plan)
- 2 – 1×4 @ 8 feet long
- 2 – 1×2 @ 8 feet long
- 3 – 1×3 @ 8 feet long
- 1 – 1×6 @ 4 feet long
- 1 – 1×12 @ 4 feet long
- 1 – sheet ½” plywood (if you need to you can rip into strips 16” wide to transport)
- 8 feet of 2 ¼” base molding
- 1 ¼” PH screws
- 1 ¼” finish nails
- 1 – 1×16 @ 49 ½”
- 1 – 1×16 @ 46 ½”
- 2 – 1×16 @ 14”
- 2 – 1×16 @ 17 ¼”
- 2 – 1×3 @ 46 ½”
- 1 – 1×2 @ 49 ½”
- 1 – 1×2 @ 48”
- 2 – 1×2 @ 15 ¾”
- 1 – 1×3 @ 45”
BACK
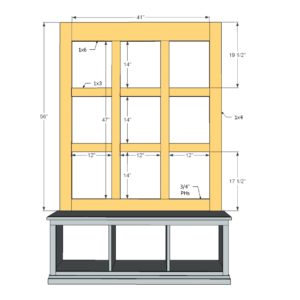
- 2 – 1×4 @ 56”
- 2 – 1×3 @ 47”
- 6 – 1×3 @ 12”
- 1 – 1×4 @ 41”
- 1 – 1×6 @ 41”
- 2 – 1×12 @ 24”
- Back is ½” plywood 48” x 74”
INSTRUCTIONS
STEP 1
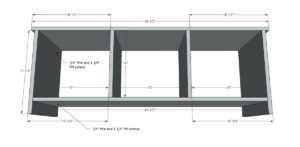
Start by building the bench storage area. It’s pretty simple, just follow along the plans and you’ll be fine!
TIP: If you want to use larger moulding on the bottom, you could raise the bottom by 1″ (making the dividers 1″ shorter) and use a 1×4 instead of a 1×3 for support.
STEP 2
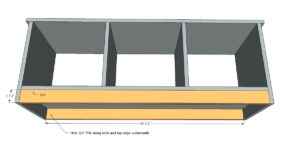
Now add the bottom supports. These are so when someone heavy sits on the hall tree the weight is transferred directly to the floor.
STEP 3
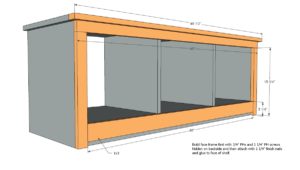
Build your face frame with 3/4″ PHs and 1 1/4″ PH screws and attach with 1 1/4″ finish nails and glue.
STEP 4
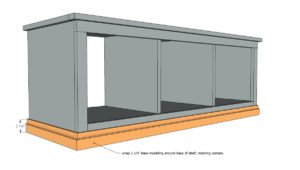
Wrap the bottom in 2 1/4″ base moulding.
TIP: If you made the bottom higher, you will want to use 3 1/4″ base moulding.
STEP 5
STEP 6
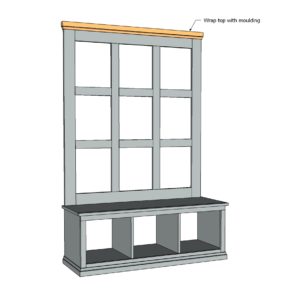
Now add the top moulding. A simple 1×2 on top would be cute too!
STEP 7
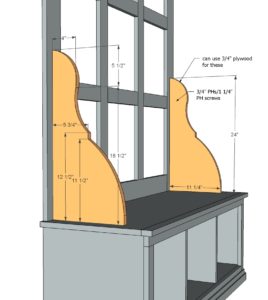
You can use leftover plywood to cut these out too! From the 1×12, mark the pattern and carefully cut out with the jigsaw. Clamp the two pieces together and sand until they match exactly. Attach in place.
STEP 8
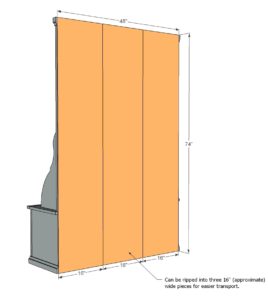
Now add the back. The back is shown in three just in case you had to cut it to fit it in your car.
FINISHING INSTRUCTIONS
Fill all holes with wood filler and let dry. Apply additional coats of wood filler as needed. When wood filler is completely dry, sand the project in the direction of the wood grain with 120 grit sandpaper. Vacuum sanded project to remove sanding residue. Remove all sanding residue on work surfaces as well. Wipe project clean with a damp cloth.
It is always recommended to apply a test coat on a hidden area or scrap piece to ensure color evenness and adhesion. Use primer or wood conditioner as needed.
CREDIT ANA WHITE

