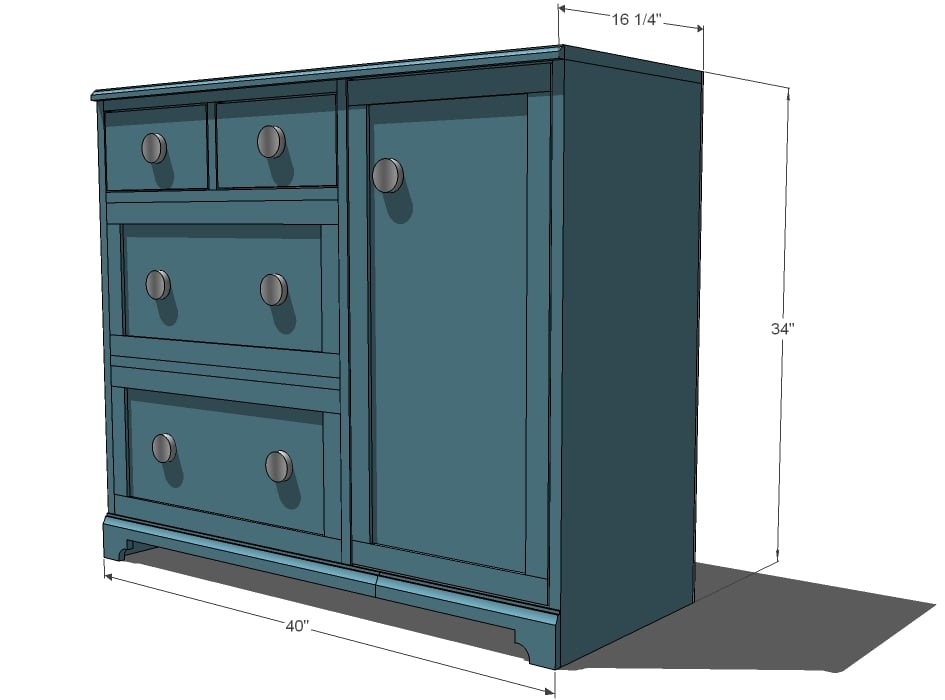
Featuring three drawers, one cupboard and a large changing area, this changing table will meet the needs of your new baby, while still looking beautiful. Works with the rest of the Madeline Changing Wall. Special thanks to our readers for sharing their photos.
DIMENSIONS
- 2 Sheet of 3/4″ MDF or 3/4″ A1 Plywood, cut into 1×16 boards
- 1 Sheet of 1/4″ MDF or Plywood or Lauan for the Back (you can use scraps for the door rails and stiles)
- 1/2 Sheet of 1/2″ Plywood for the Door and Large Drawer Faces
- 1 – 1×6 Board, 10′ Long (for the Small Drawers)
- 1 – 1×10 Board, 10′ Long (for the Large Drawers)
- 1 – 1×2 Board
3 1/4″ Floor trim or base moulding - 3/4″ Edge Trim (3/4″ wide)
- 2″ Screws
- 1 1/4″ Nails and Screws
- 5/8″ Nails
- Wood Glue
- Wood Filler
- Sand Paper
- Finishing Supplies
- 2 Sets of Undermount Drawer Slides, 14″ long (for large drawers)
- 1 Set of Hinges
- Knobs
- Shelf Pins (for adjustable shelves)
- paint
- paintbrush
Cutting List for Box
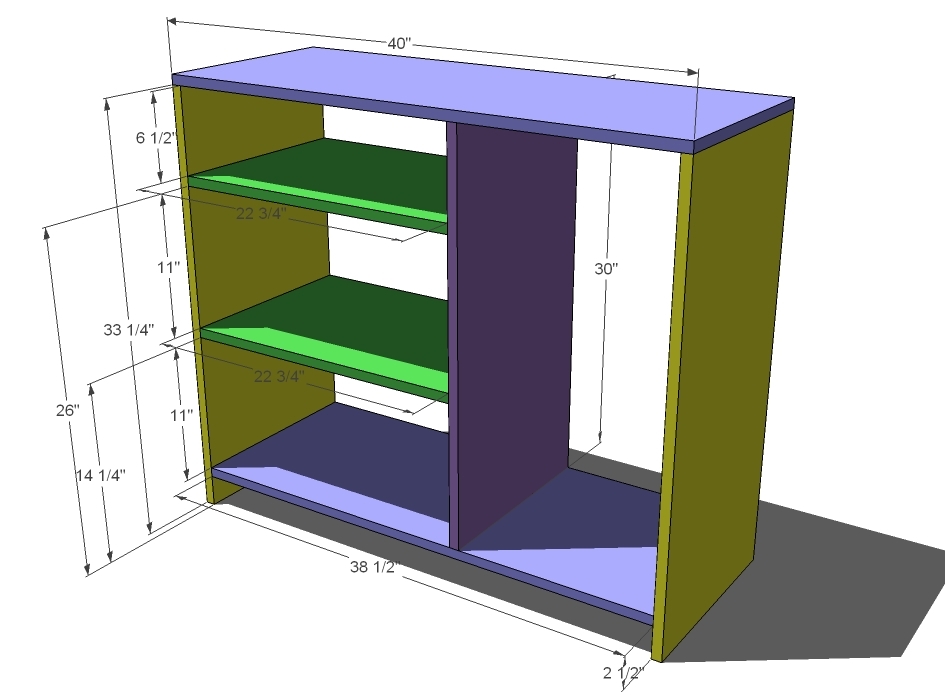
- 2 – 1×16 @ 33 1/4″ (Sides)
- 1 – 1×16 @ 30″ (Vertical Divider)
- 2 – 1×16 @ 22 3/4″ (Horizontal Dividers)
- 1 – 1×16 @ 38 1/2″ (Bottom)
- 1 – 1×16 @ 40″ (Top)
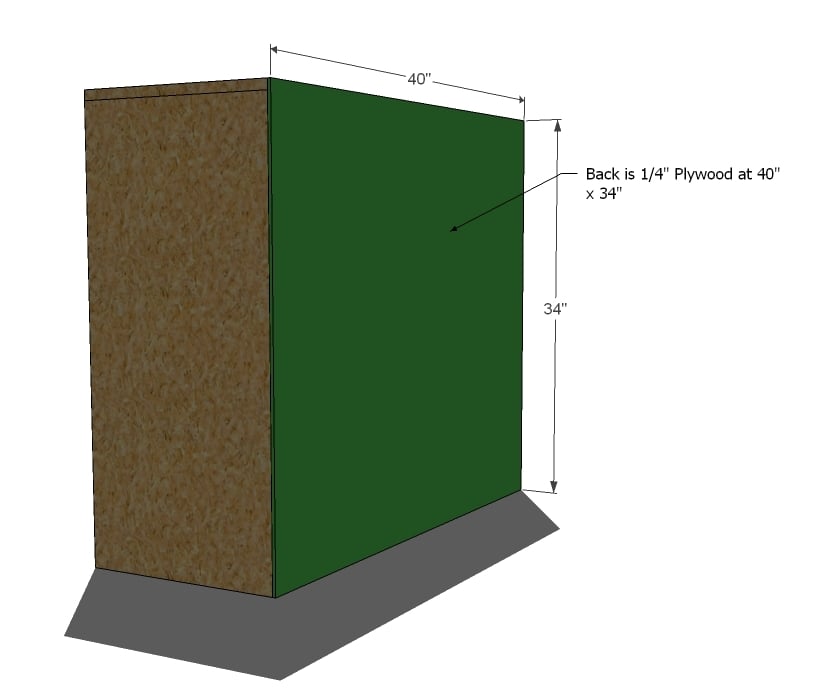
- 1 – 1/4″ Plywood or MDF @ 40″ x 34″ (Back)
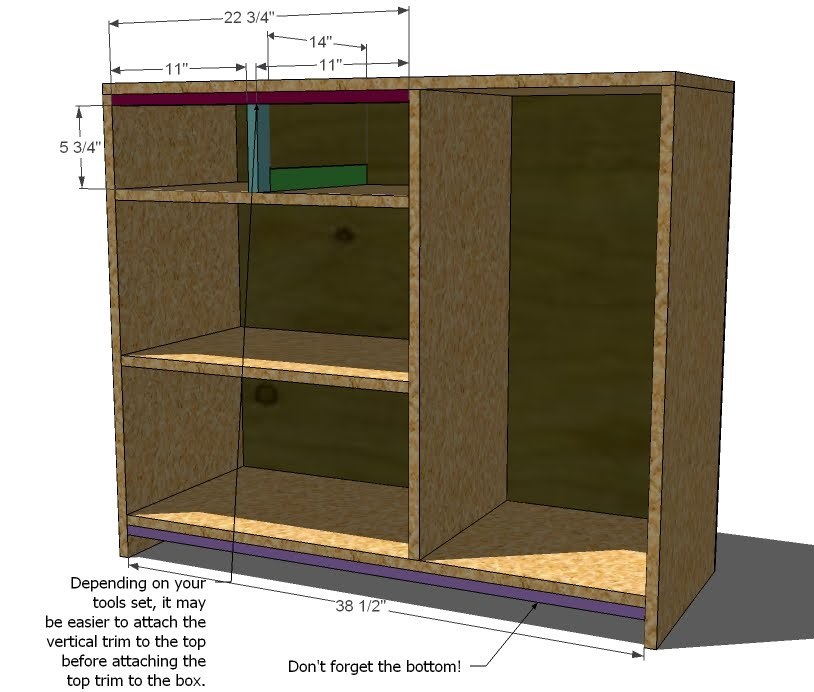
- 1 – 1×2 @ 22 3/4″ (Top Inside Trim)
- 1 – 1×2 @ 38 1/2″ (Bottom Inside Trim)
- 1 – 1×2 @ 5 3/4″ (Front Drawer Divider Trim)
- 1 – 1×2 @ 14″ (Drawer Guide)
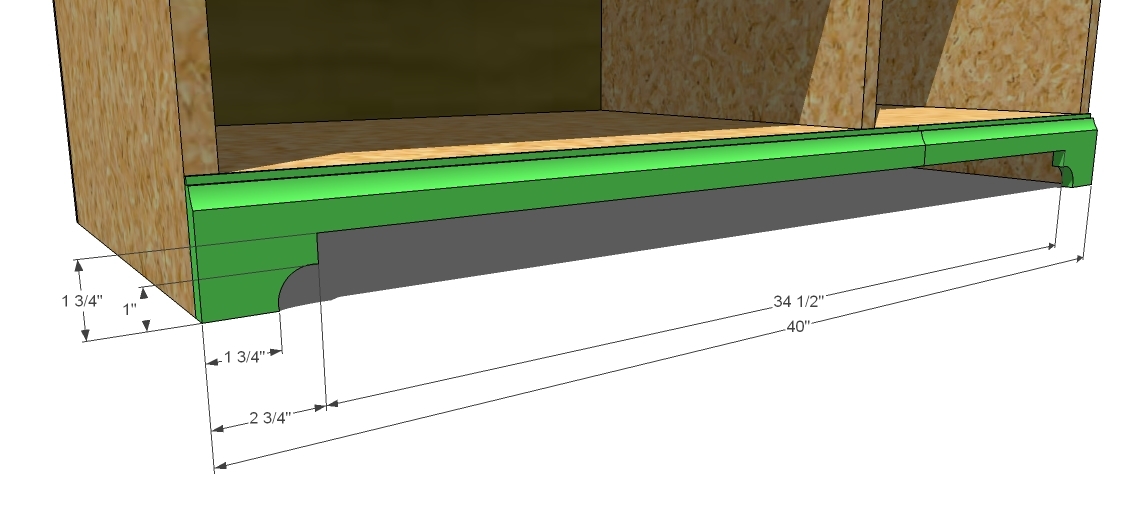
- 1 – 3 1/4″ Base Moulding @ 40″ (Base Moulding, cut out)
- 1 – 3/4″ Edge Trim @ 40″ (Front Edge Trim)
- 2 – 1×16 @ 9 1/4″, then trimmed down to a finish size of 14″ x 9 1/4″ (Drawer Bottoms)
- 2 – 1×6 @ 9 1/4″ (Drawer Backs)
- 4 – 1×6 @ 14 3/4″ (Drawer Sides)
- 2 – 1×6 @ 10 3/4″ (Drawer Faces)
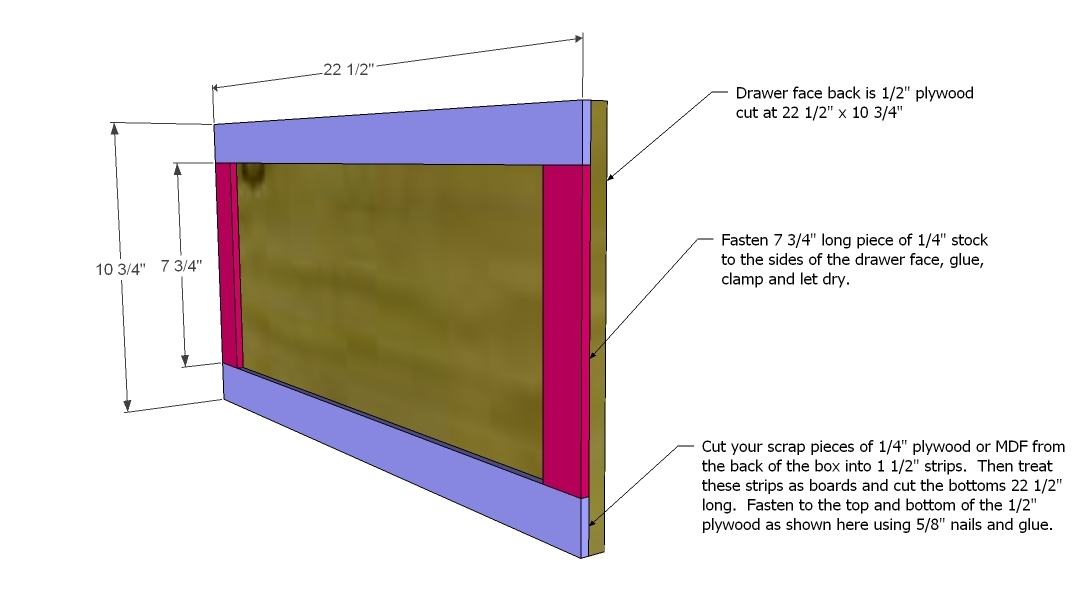
- 2 – 1/2″ Plywood @ 22 1/2″ x 10 3/4″ (Drawer Face Backs)
- 4 – 1/4″ Plywood @ 22 1/2″ (Drawer Rails)
- 4 – 1/4″ Plywood @ 7 3/4″ (Drawer Stiles)
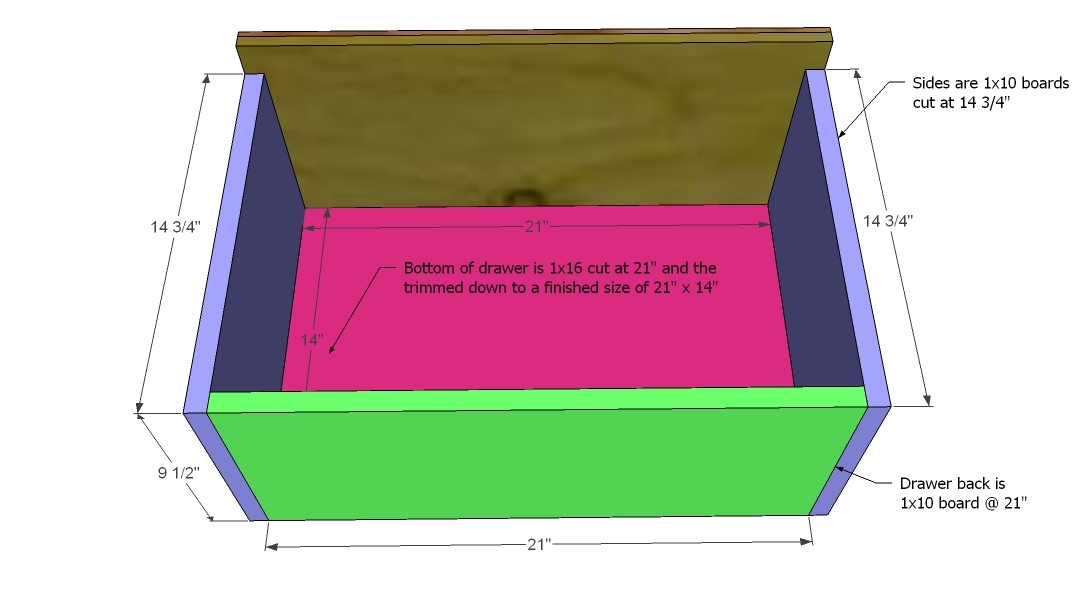
- 2 – 1×16 @ 21″ cut down to a finished size of 21″ x 14″ (Drawer Bottoms)
- 4 – 1×10 @ 14 3/4″ (Drawer Sides)
- 2 – 1×10 @ 21″ (Drawer Backs)
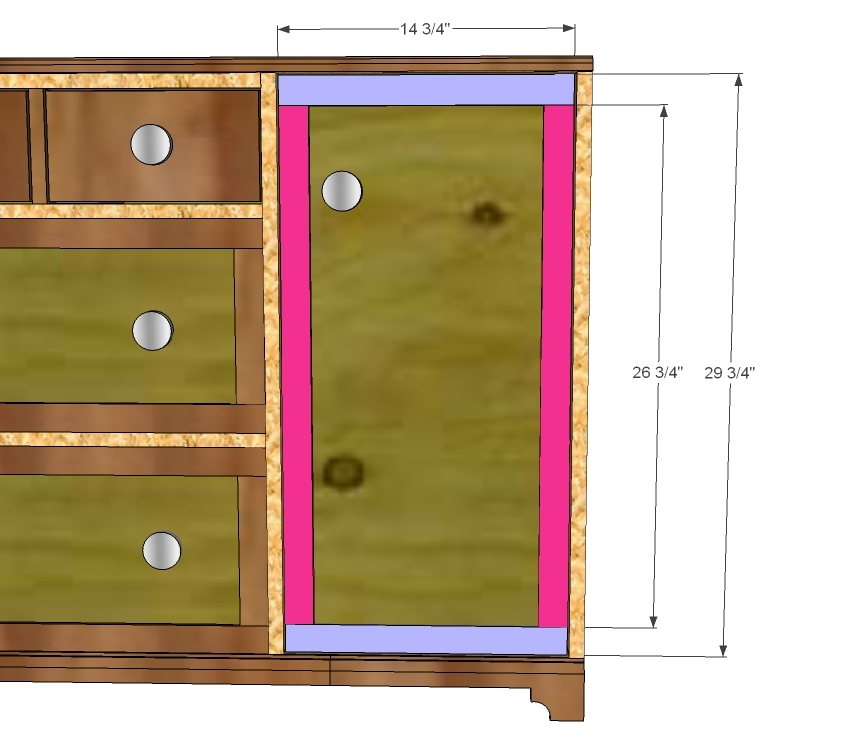
- 1 – 1/2″ Plywood @ 29 3/4″ x 14 3/4″ (Door Backs)
- 2 – 1/4″ Plywood cut into strips 1 1/2″ @ 14 3/4″ (Door Rails)
- 2 – 1/4″ Plywood cut into strips 1 1/2″ @ 26 3/4″ (Door Stiles)
INSTRUCTIONS
STEP 1
Build the Box. Begin by attaching the inner dividers together, as shown above. Start on the inside and work outward. It always is a good idea to mark out your joints on both the inside and the outside of your boards so you know where to line up your boards, and where to fasten. Also in this step, if you would like to add a shelf to the right compartment, cut the shelf (or shelves) at 15″ from 1×16 scraps. You can also attach later using shelf pins to create adjustable shelves. Remember that your boards are 3/4″ thick. Use 2″ screws and glue.
STEP 2
Back. Square up your project and add the back. The easiest way is to use lots of glue and 1 1/4″ brad nails (either with your pneumatic nailer set on a lower pressure setting to keep the nails from shooting through) or with a good ole hammer. You can use the scraps from the back as your door and drawer face rails and stiles.
STEP 3
1×2 Inner Boards. Begin by building the top drawer divider system by fastening the blue, green and pink boards together. Use 2″ screws (you won’t need many). Then fasten the Green and Pink boards to the box, usine 1 1/4″ screws and glue. Fasten the boards from underneath to hide your screws. Don’t forget the bottom board!
STEP 4
Base Moulding. Cut your bottom moulding and attach, using 1 1/4″ nails and glue. Then cut out the moulding as shown above using a jigsaw.
STEP 5
STEP 6
Small Top Drawers
Because these drawers are so small, I have decided to not add drawer slides to the drawers. If you would like to add drawer slides, you would need to build the drawer 1″ less on the sides to account for a 1/2″ side mount drawer slide. Build 2 Drawers.
Construct your drawer by first fastening the back to the bottom using 2″ screws. Then fasten the sides to the bottom and the back using 2″ screws and glue. Then attach the face. I like to fit the drawer into the drawer housing without the face attached, then line the face up with the drawer and fasten in place centering the face on the opening.
STEP 7
Large Bottom Drawers
These drawers are quite a bit larger, and you will need to use drawer slides. I have designed these drawers with undermount slides to make them easier to install, but you could also use side mount slides. You would then need to make your drawer 1″ less wide to accommodate 1/2 clearance side mount slides.
1. Drawer Face. Build your drawer face as shown above. Use glue. Clamp and let dry flat, stacked on top of each other, on a level surface, with a heavy object on top.
STEP 8
Drawer Box. First cut your drawer bottom using a 1×16 @ 21″, and then trim the 1×16 down to a finished size of 21″ x 14″. By doing this, you will get a more square drawer bottom. Then fasten the back to the bottom using 2″ screws, then the sides. Use glue. Mount the faceless drawer onto the undermount drawer slides. Push the drawer all the way into the drawer housing, adjust so that the faceless drawer is inset 3/4″. Set the face on the drawer box and screw in place, centering on the opening.
STEP 9
Large Door
Build the Large Door Face as you did the large drawer faces.
CREDIT ANA WHITE

