This sturdy Farmhouse style kitchen island features two drawers and a large bottom shelf. Solid wood legs.
26″ x 60″ x 30″ Tall
PREPARATION
- 1 Sheet of 3/4″ MDF or Plywood
- 1 – 12′ 4×4 Post
- 1 – 8′ 2×8 Board
- 1 – 12′ 1×8 Board
- 1 – 8′ 2×2 Board
- 4 – 8′ 1×4 Boards
- 2 – Sets of 21″ Side Mount Drawer Slides
- 2″ Screws
- 3″ Screws
- Wood Glue
- Wood Putty
- Sandpaper
- A) 4 – 4×4 Posts @ 34 1/2″ (Legs)
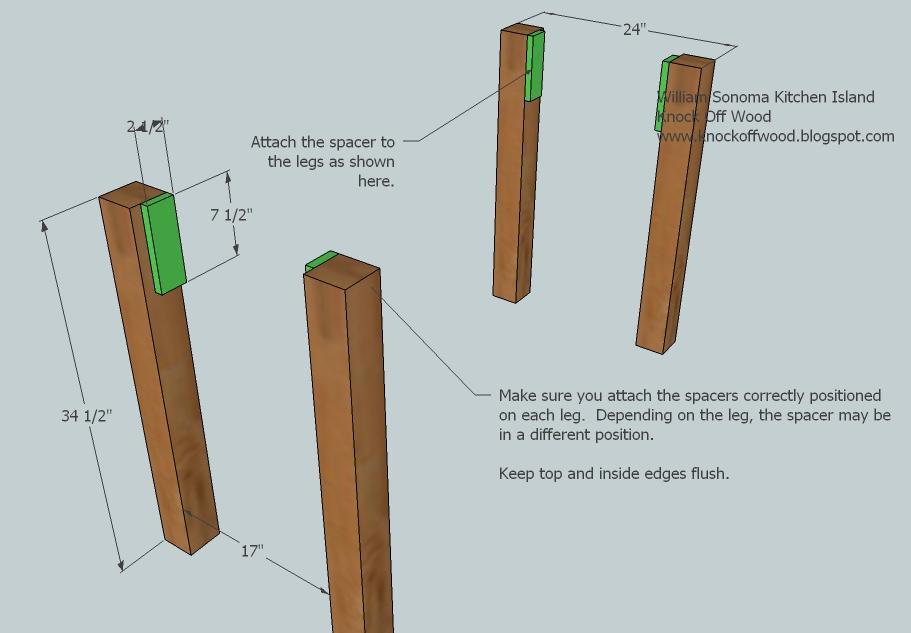
- B) 4 – 1×3 @ 7 1/2″ (Spacers)
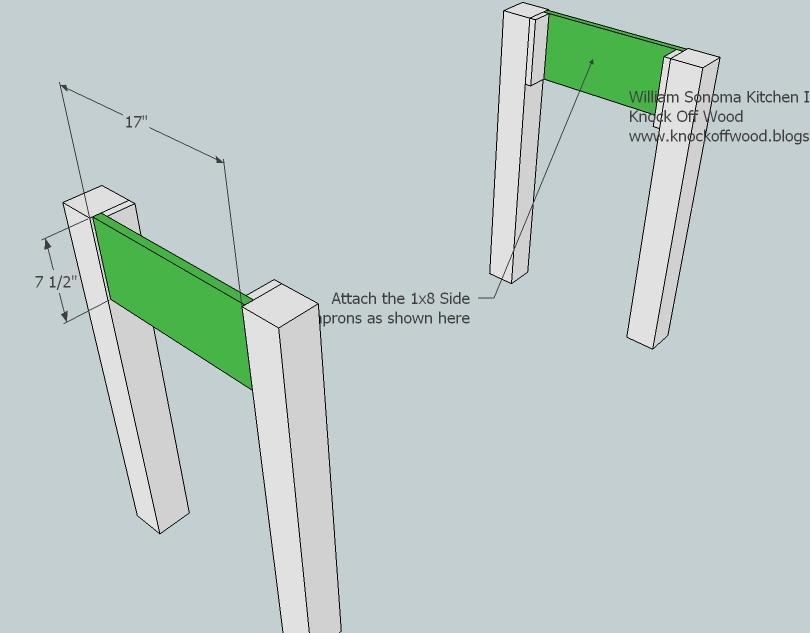
- C) 2 – 1×8 @ 17″ (Side Aprons)
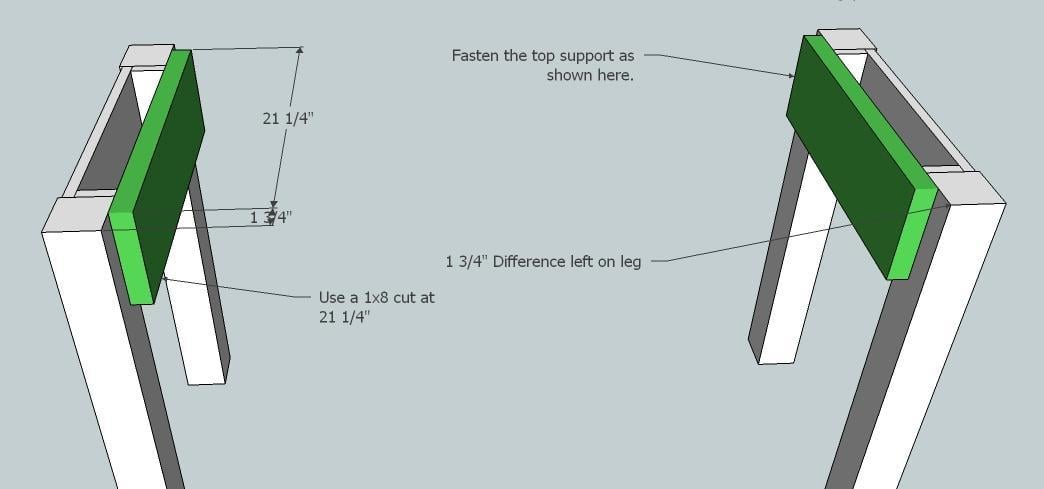
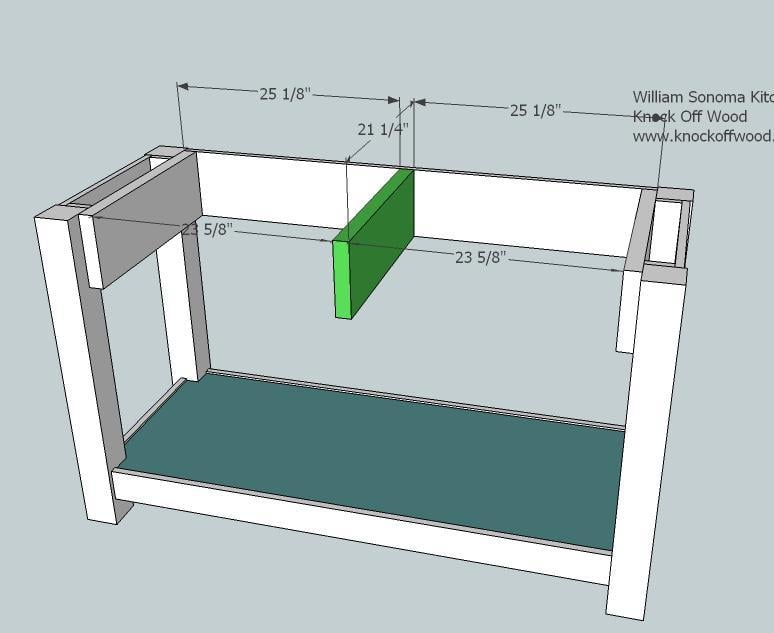
- D) 3- 2×8 @ 21 1/4″ (Top Support and Center Divider)
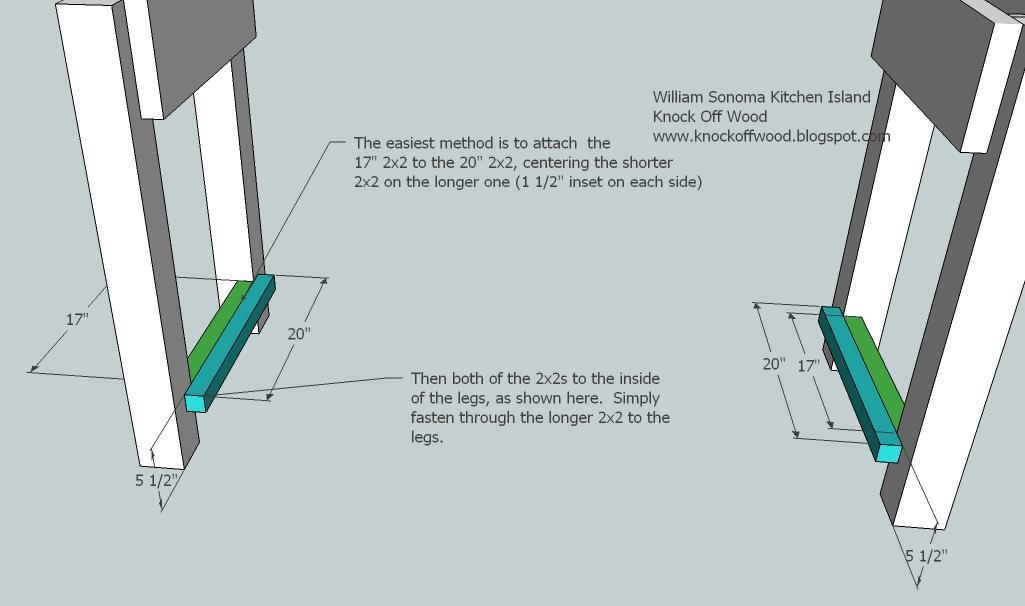
- E) 2 – 2×2 @ 17″ (Bottom Supports, Outside)
- F) 2 – 2×2 @ 20″ (Bottom Supports, Inside)
- G) 1 – 1×8 @ 51 3/4″ (Back Apron)
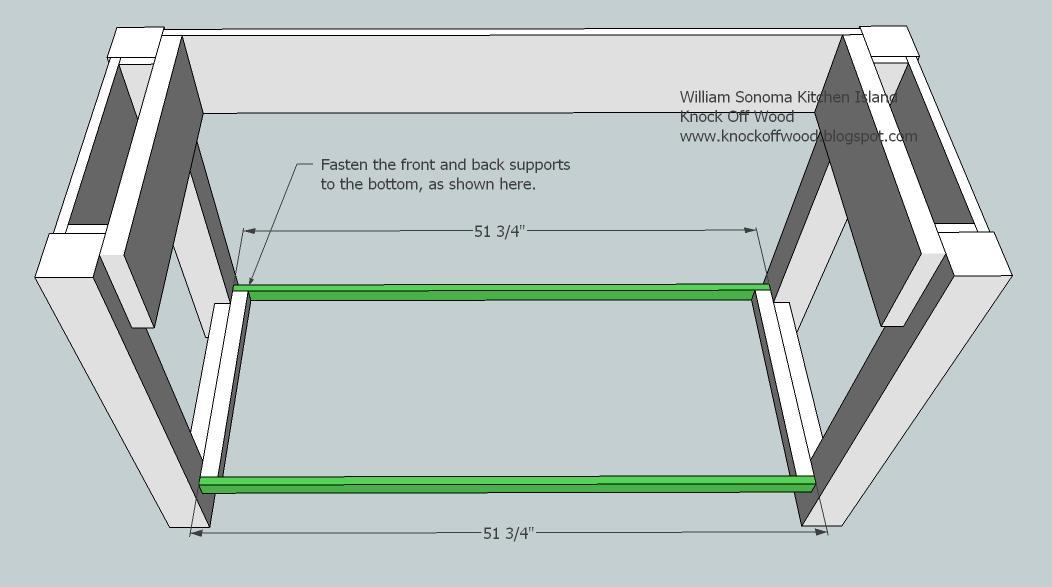
- H) 2 – 1×2 @ 51 3/4″ (Bottom Front and Back Supports)
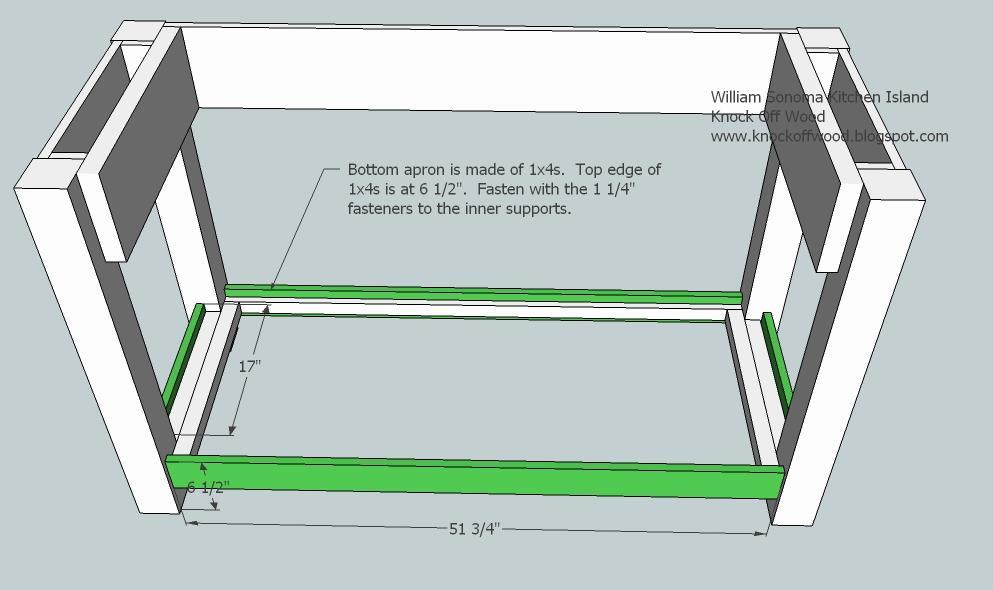
- I) 2 – 1×4 @ 17″ (Side Trim for Bottom Shelf)
- J) 2 – 1×4 @ 51 3/4″ (Front and Back Trim for Bottom Shelf)
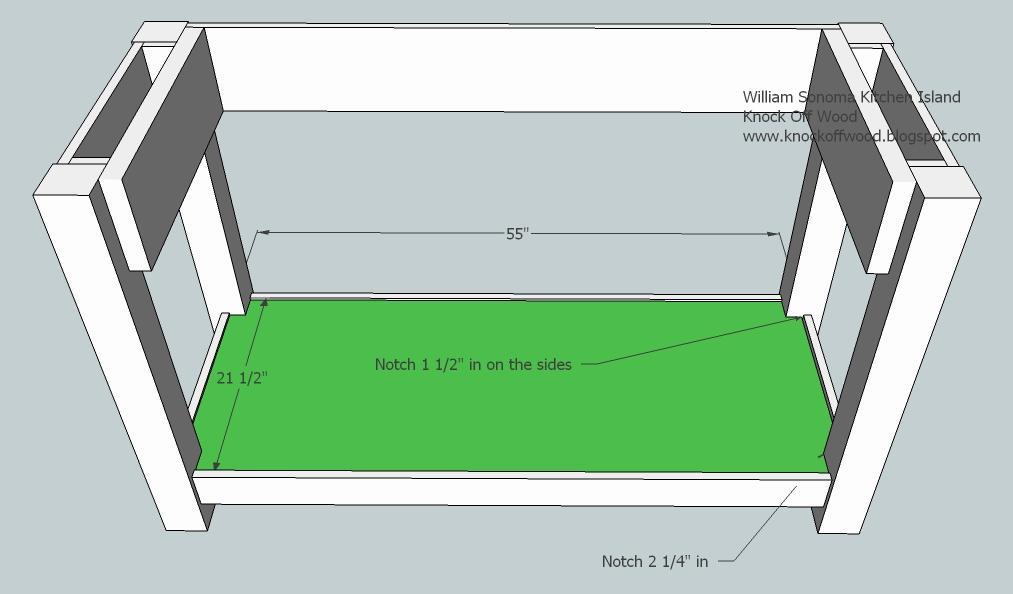
- K) 1 – 3/4″ Plywood @ 21 1/2″ x 55″ (Bottom Shelf) Notched out corners
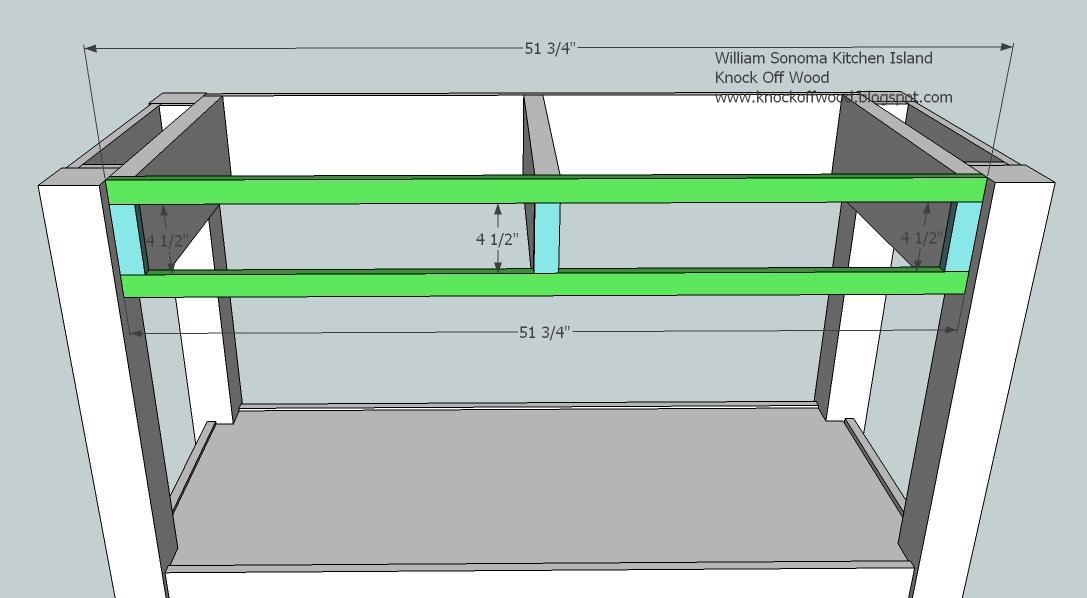
- L) 2 – 1×2 @ 51 3/4″ (Front Face Trim, Horizontal)
- M) 3 – 1×2 @ 4 1/2″ (Front Face Trim, Vertical)
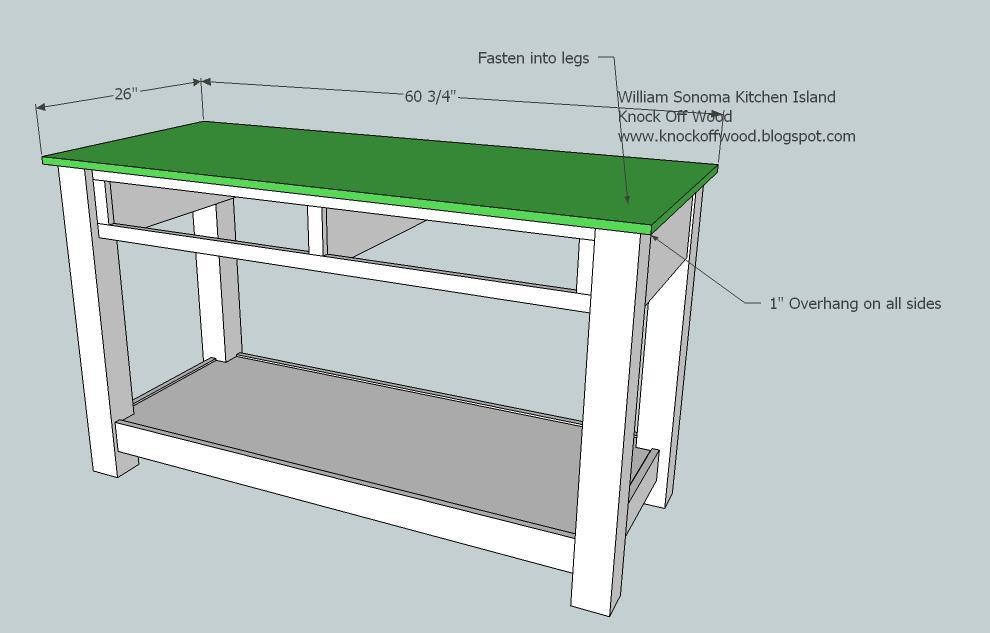
- N) 1 – 3/4″ Plywood @ 26″ x 60 3/4″ (Top)
Drawer Cut List Approximations (Cut Drawers to fit your glides and openings)
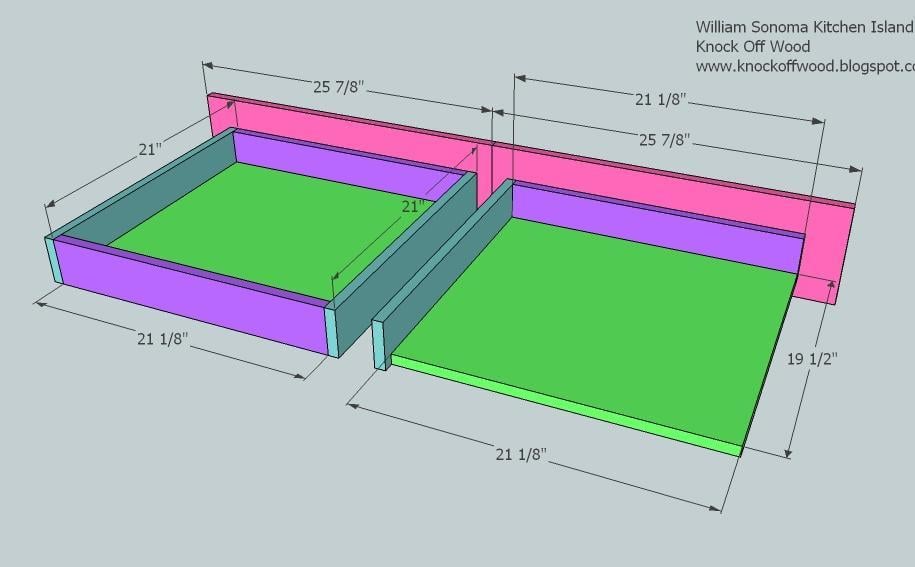
- O) 2 – 3/4″ Plywood @ 21 1/8″ x 19 1/2″ (Drawer Bottoms)
- P) 4 – 1×4 @ 21 1/8″ (Drawer Fronts and Backs – shown in purple)
- Q) 4 – 1×4 @ 21″ (Drawer Sides)
- R) 2 – 1×8 @ 25 7/8″ (Drawer Faces – CUT TO FIT)
INSTRUCTIONS
STEP 1
Spacer. Attach the spacers, B, to the legs, as shown above. Notice how the spacers are not all located in the same position on each leg. Take not of where each leg will be place when fastening the spacer.
STEP 2
Side Apron. Fasten the side apron to the spacers, as shown above.
STEP 3
Top Support. Use 3″ screws to fasten the top support to the legs, as shown above. Use the above measurements to guide you. Notice the 1 3/4″ difference on the sides, as shown above.
STEP 4
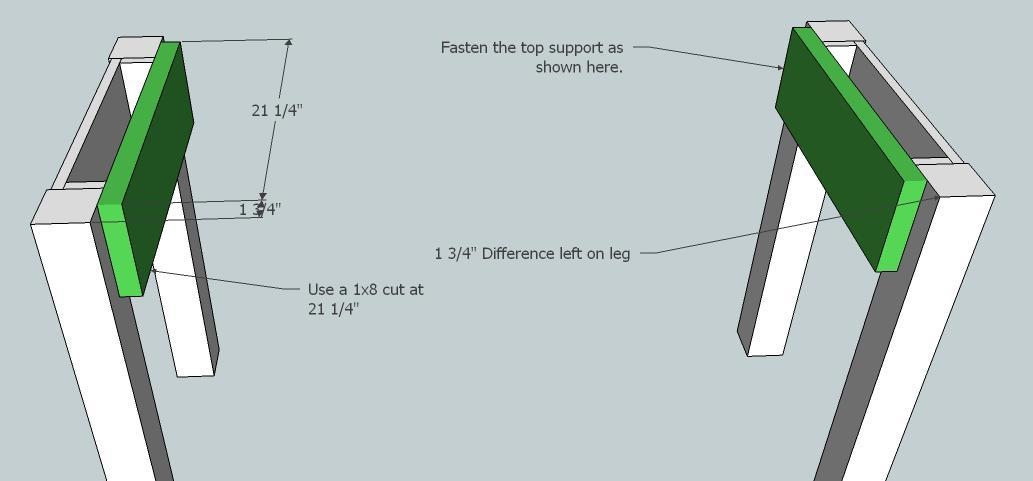
Top Support. Use 3″ screws to fasten the top support to the legs, as shown above. Use the above measurements to guide you. Notice the 1 3/4″ difference on the sides, as shown above.
STEP 5
STEP 6
Back Apron. Use the 2″ screws and glue to fasten the back apron in place as shown above. Use glue and make sure you square everything up.
STEP 7
Bottom Front and Back Supports, H. Fasten the bottom front and back supports to the side supports, as shown above. If you plan on having heavy objects on the bottom shelf, I recommend adding a couple of 2×2 supports cut at 20″ between the boards H. Don’t forget to take a square of the project.
STEP 8
Bottom Front and Back Supports, H. Fasten the bottom front and back supports to the side supports, as shown above. If you plan on having heavy objects on the bottom shelf, I recommend adding a couple of 2×2 supports cut at 20″ between the boards H. Don’t forget to take a square of the prone
STEP 9
Bottom Shelf. Notch out the corners of the bottom shelf to fit, as shown above. Then place on the bottom shelf. Fasten in place.
STEP 10
Center Drawer Divider. Using your remaining board D, Use 3″ screws to fasten the divider in place. You must make sure this board is placed square. Any out of square joints will cause your drawers to not glide smoothly.
STEP 11
Face Trim. Start by fastening with 2″ fasteners the boards L in place. Make sure you fasten to the middle divider, being certain that the middle divider has remained in place from step 10. Then fasten the boards M in place.
STEP 12
Top. Fasten the top in place. You will want to fasten to the trim from step 11, the legs, and aprons, and the supports, boards D (the 2x8s). Center the top, leaving a 1″ overhang on all sides. You may wish to add the top after you have built and inserted the drawers.
STEP 13
Drawers. Read the instructions from the drawer slides before attempting to build your drawers. The above measurements are expecting you to use side mount drawer slides that need 1/2″ clearance on the drawer sides. I recommend measuring your openings and building your drawers to fit your openings.
YOU MUST CUT YOUR BOTTOM PLYWOOD PERFECTLY STRAIGHT. Then fasten the front and back of the drawers (made of 1x4s) to the drawer bottom. Then fasten the sides to the bottom and front and back. Then use your drawer guides to fit your drawers into the drawer openings.
Once your drawers are set in place, measure and cut your drawer faces. Mark the center of the drawer face and add a 1/8″ deep cut to the center, creating the look of 2 drawers. Then position the faces on the drawers and nail in place using 1 1/4″ nails and glue. Use just a couple of nails per drawer face, avoiding the area where you will place pulls or knobs. Then pull the drawers out and use screws to fasten from the inside of the drawer into the drawer face.
CREDIT ANONYMOUS AT www.anawhite.com

