Dimensions
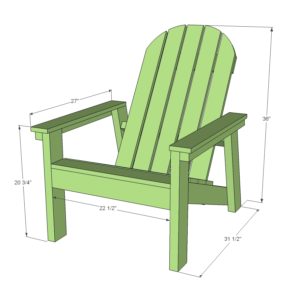
PREPARATIONS
SHOPPING LIST
- 3 – 2×4 @ 8 feet long
- 1 – 2×2 @ 6 feet long
- 4 – 1×4 @ 8 feet long
- (30) 2 1/2” self-tapping wood screws
- (60) 2” self-tapping wood screws
- (20) 1 1/4” wood screws
- exterior appropriate wood glue
CUT LIST
- 2 – 2×4 @ 20 3/4” long with BOTH ends cut PARALLEL at 15 degrees off square, long point to short point measurement (back legs)
- 2 – 2×4 @ 20” (front legs)
- 2 – 2×2 @ 26 1/2” long, longest point measurement, ONE end cut at 15 degrees off square (arm support)
- 2 – 2×4 @ 31 7/8” long, ONE end cut at 35 degrees off square to longest point, OTHER END cut at 20 degrees off square to the shortest point – see step 1 (stringers)
- 2 – 2×4 @ 22 1/2” (front apron and back support)
- 5 – 1×4 @ 22 1/2” (seat slats)
- 5 – 1×4 @ 36” (back slats)
- 1 – 1×4 @ 19 1/2” (back top support)
- 1 – 2×4 @ 19 1/2” (back base support)
- 2 – 1×4 @ 27” (armrests
INSTRUCTIONS
STEP 1
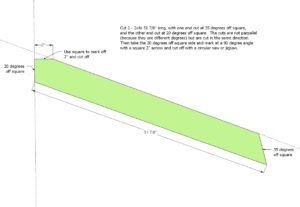
From the stretcher board, cut off top portion by marking with a square and cutting off with a jigsaw. Do this on both stretcher boards.
STEP 2
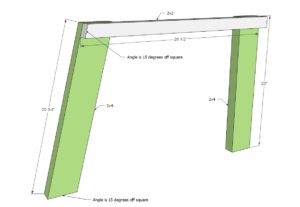
Attach one back leg and one front leg to arm support with 2 1/2” exterior screws. Keep the top and outside edges flush.
STEP 3
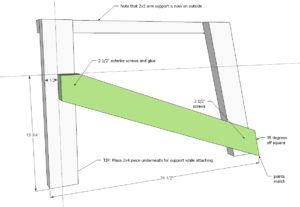
Mark the front leg on the inside with arm support on the outside, as shown in the diagram. Leave 1 1/2” space in front of a stretcher. Attach stretcher to front and back legs with 2 1/2” exterior screws and glue.
STEP 4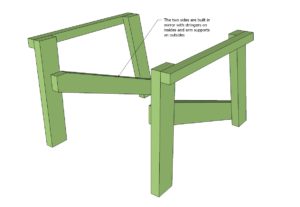
Build the opposite side of the chair in the mirror, with arm supports outside and stretcher to inside. Make sure the two match up.
STEP 5

Front Apron is attached to fronts of the stretcher and from outside of the chair for additional support.
STEP 6
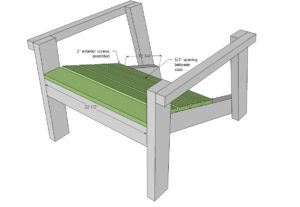
Begin at the front of the chair and attach seat slats to the stretcher with 2” screws and glue. Leave a 1/2” gap between seat slats.
STEP 7
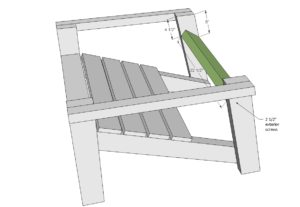
Attach back support to back legs with 2 1/2” exterior screws, matching up measurements in diagrams.
STEP 8
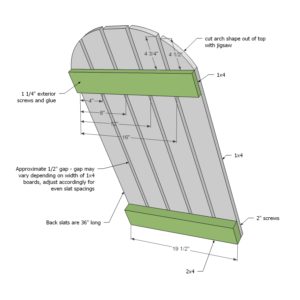
Build back by attaching all backboards to seat back base support, leaving approximately 1/2” gap in between. Then attach at the top with 1 1/4” screws. Cut arch shape on the back top using a large round object to guide you.
STEP 9
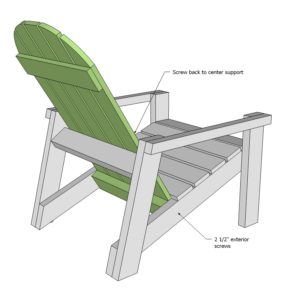
Place back inside chair and secure in place with 2 1/2” exterior screws. Also screw back to back support with 2” exterior screws.
STEP 10
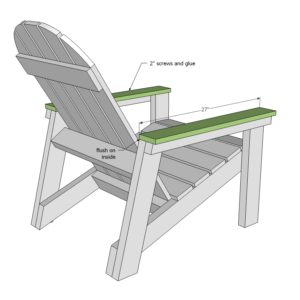
Secure armrests to arm supports and tops of legs with screws and glue.
STEP 11
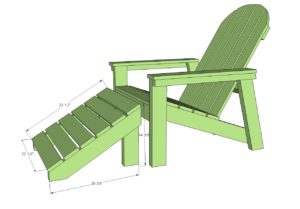
Optional Adirondack Footstool Plans
Adding a footstool to your Adirondack chair will increase comfort! We’ve included the plans below that match this Adirondack plan.
FOOTSTOOL SHOPPING LIST
- 1 – 2×4 @ 8 feet long or stud length
- 1 – 1×4 @ 12 feet long
- 2” and 2 1/2” exterior screws
FOOTSTOOL CUT LIST
- 2 – 2×4 @ 23 1/2” long with both ends cut at 30 degrees off square, parallel to each other, long point to short point measurement (stringers)
- 5 – 1×4 @ 22 1/2” (top boards)
- 2 – 2×4 @ 13 3/4” long with one end cut at 30 degrees off square, longest point measurement (legs)
STEP 12

Cut the Adirondack footstool stringers with a compound miter saw first. Then use a square to mark the cut-off and cut with a jigsaw or circular saw.
STEP 13
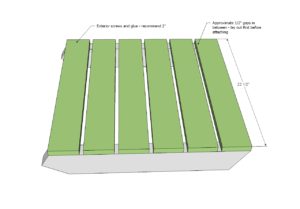
Use 2″ screws and glue to attach the deck boards on top of the stringers.
STEP 14
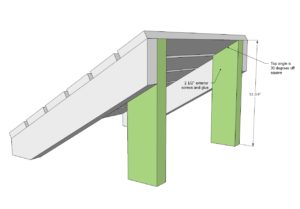
Attach legs with 2-1/2″ screws to insides of the stringers to complete the footstool.
FINISHING INSTRUCTIONS
Fill all holes with wood filler and let dry. Apply additional coats of wood filler as needed. When wood filler is completely dry, sand the project in the direction of the wood grain with 120 grit sandpaper. Vacuum sanded project to remove sanding residue. Remove all sanding residue on work surfaces as well. Wipe project clean with a damp cloth.
It is always recommended to apply a test coat on a hidden area or scrap piece to ensure color evenness and adhesion. Use primer or wood conditioner as needed.
CREDIT ANA WHITE
