DIMENSIONS
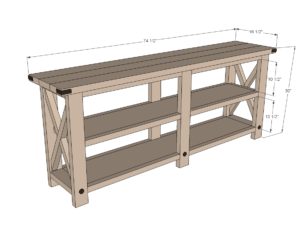
Dimensions are shown above
PREPARATIONS
SHOPPING LIST
- 6 – 2×2 @ 8 feet long
- 3 – 2×4 @ 8 feet long
- 1 – 1×12 @ 12 feet long
- 3 – 2×6 @ stud length or 8 feet
- Corner hardware/decorative bolts
- 1 1/4″ and 2 1/2″ pocket hole screws
- 2 1/2″ screws
COMMON MATERIALS
- 12 – 2×2 @ 30”
- 6 – 2×4 @ 28 1/2″
- 2 – 1×12 @ 63 1/2″
- 5 – 2×4 @ 11 1/4″
- 2 – 2×2 @ 11 1/4″
- 2 – 2×2 @ 22 1/2″ (long point to short point, ends parallel, cut at 60 degrees off square)
- 4 – 2×2 @ 11 1/4″ (longest point to shortest point, long end cut at 60 degrees off square, short point cut at 30 degrees off square, angles are in same direction)
- 3 – 2×6 @ 74 1/2″
CUTTING INSTRUCTIONS
If your saw does not cut 60 degrees off square, you will need to mark cuts with an angle square or compass/protractor and cut angles with circular saw or jigsaw. Practice this cut first on scraps!
INSTRUCTIONS
STEP 1
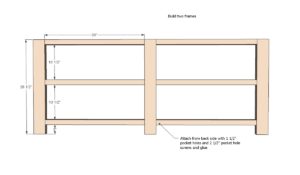
First, build two frames as shown in the diagram.
STEP 2
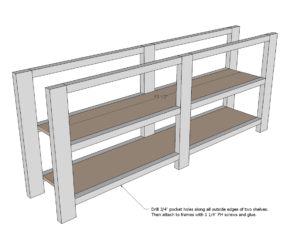
Then attach frames to shelves. NOTE: I recommend drilling 3/4″ pocket holes with Kreg Jig around all sides of each shelf for attaching all shelf trim with 1 1/4″ Pocket Hole screws later on.
STEP 3
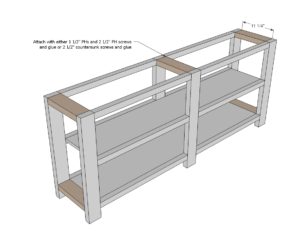
2×4 end supports need to be the same width as your 1×12 boards – expected to be 11 1/4″ wide. Measure the width of your 1x12s and cut the 2×4 supports to match this width.
Attach to frames and shelves. For attaching to frames, use 1-1/2″ pocket holes with 2-1/2″ pocket hole screws.
STEP 4
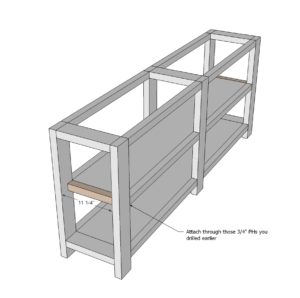
Add trim to the shelf.
STEP 5
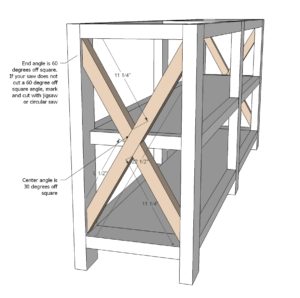
The X can be cut by just placing the uncut board alongside its permanent position, and marking the overlap with a pencil, and then cutting the pencil lines with a circular saw or jigsaw.
First, do the longer piece, then place inside the project, but don’t attach yet.
The figure the smaller piece cuts and make those cuts.
Fit the smaller pieces in the project, and trace where they need to be joined to the larger piece.
Remove all pieces and attach the smaller pieces to the longer piece.
Then place the entire X inside the opening and attach.
STEP 6
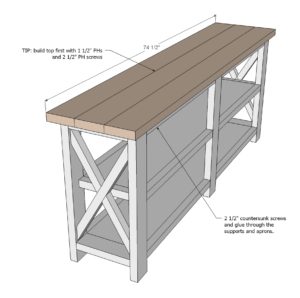
And then add the top. You can build top first with 1 1/2″ pocket holes and 2 1/2″ pocket hole screws and then attach to top through 2×4/2×2 aprons or just plank the top for a rustic look – it’s up to you.
TIP: Just use your 2 1/2″ pocket hole screws to attach the top so you don’t have to go out and buy more 2 1/2″ screws.
FINISHING INSTRUCTIONS
Fill all holes with wood filler and let dry. Apply additional coats of wood filler as needed. When wood filler is completely dry, sand the project in the direction of the wood grain with 120 grit sandpaper. Vacuum sanded project to remove sanding residue. Remove all sanding residue on work surfaces as well. Wipe project clean with a damp cloth.
It is always recommended to apply a test coat on a hidden area or scrap piece to ensure color evenness and adhesion. Use primer or wood conditioner as needed.
CREDIT ANA WHITE
