DIMENSIONS
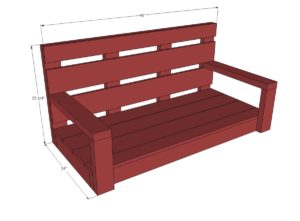
Dimensions are shown above.
PREPARATION
- 5 – 2×4 @ 8 feet long
- 2 – 1×6 @ 8 feet long
- 1 – 1×6 @ 4 feet long
- 1 – 1×4 @ 8 feet long
Pocket holes are not necessary for this plan, but if you do have a Kreg Jig, you’ll want to use the 2 1/2″ exterior pocket hole screws. 2 1/2″ exterior self-tapping screws for building the frame (unless you assemble with pocket holes) 1 1/2″ exterior self-tapping screws for attaching seat and back slats Hardware for hanging.
- 2 – 2×4 @ 48″
- 4 – 2×4 @ 18″
- 4 – 2×4 @ 19 3/4″
- 1 – 2×4 @ 48″
- 2 – 2×4 @ 11 1/4″
- 2 – 2×4 @ 22 1/2″
- 5 – 1×6 @ 48″
- 2 – 1×4 @ 48″
INSTRUCTIONS
STEP 1
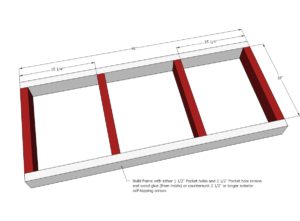
First, build a basic 2×4 frame.
STEP 2
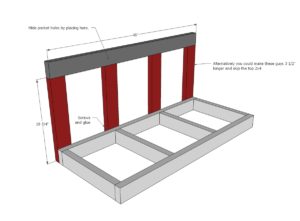
And then attach back supports and top 2×4.
NOTE: If you don’t have a pocket hole jig, an alternative is to cut your back boards 3 1/2″ longer and omit the top back board.
STEP 3
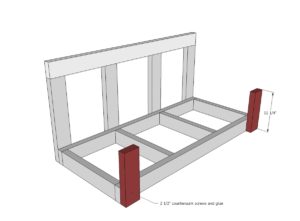
Then attach the front arm supports.
STEP 4
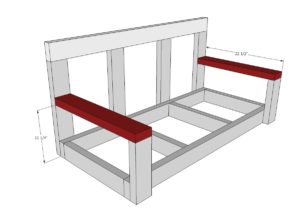
And then the arm supports on top.
STEP 5
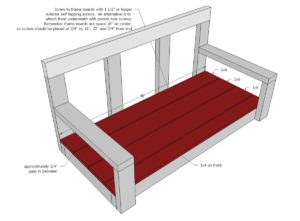
STEP 6
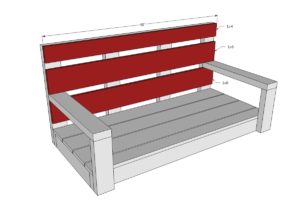
And then attach the back seat boards to the back supports.
STEP 7
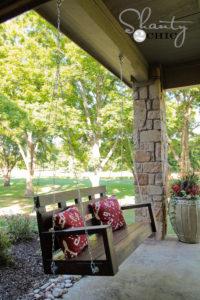
For more details on hanging the swing – please visit Shanty2Chic here.
FINISHING INSTRUCTIONS
Fill all holes with wood filler and let dry. Apply additional coats of wood filler as needed. When wood filler is completely dry, sand the project in the direction of the wood grain with 120 grit sandpaper. Vacuum sanded project to remove sanding residue. Remove all sanding residue on work surfaces as well. Wipe project clean with a damp cloth.
It is always recommended to apply a test coat on a hidden area or scrap piece to ensure color evenness and adhesion. Use primer or wood conditioner as needed.
CREDIT ANA WHITE
