Preparation
SHOPPING LIST
- 1 – 1×12 @ 10 feet long (you can make mods shown in the cut list to use an 8 footer, but the cubbies will be really short)
- 1 – 1×3 @ 8 feet long
- 3 – 2×2 @ 8 feet long
- 2 – 1×2 @ 8 feet long
- 8 – 1×2 @ 6″ (Slats)
- 2 – 1×3 @ 33″ (Back)
- 2 – 2×2 @ 28 1/2″ (Back Legs)
- 3 – 2×2 @ 33″ (Back Support, Bottom and Front 2x2s)
- 1 – 1×12 @ 36″ (Seat)
- 2 – 1×12 @ 11″ (Sides) (Make this measurement 9″ if you want to get all your cuts in a single 8 foot 1×12)
- 1 – 1×12 @ 9 1/2″ (Center Divider) (Make this measurement 8 1/2″ if you want to get all of your cuts in a single 1×12)
- 1 – 1×12 @ 33″ (Bottom of Cubbies)
- 4 – 1×2 @ 11 1/2″ (Width of your 1x12s – adjust to fit)
- 1 – 1×2 @ 36″ (Front Trim)
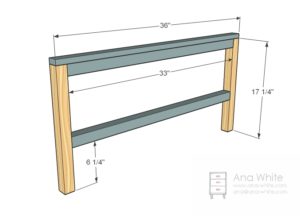
- 2 – 2×2 @ 17 1/4″ (Front Legs)
INSTRUCTIONS
STEP 1
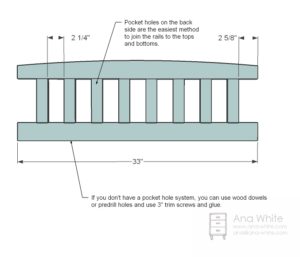 Back
Back
Mark out your back 1×3 boards for the placement of the 1×2 rails. Either drill a pocket hole at each end of the rails (1x2s @ 6″ long) or carefully predrill a hole for screws from the tops and bottoms of the 1x3s OR drill holes in both the rails and top/bottom for wood dowels. With glue applied, you will only need one screw per end of each rail.
I tapered the top of the back by measuring in 9″ from the end of the 1×3 top board and down 1″. I drew a straight line and cut with my jigsaw. Then I rounded the top with a sander to make it look like it is an arched top (it is really not).
STEP 2
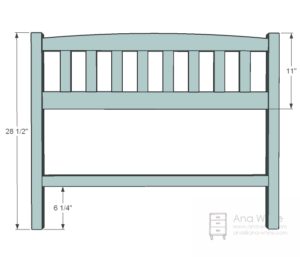
Finishing the Back
Measure and mark out the placement of the joints and predrill holes. Either use pocket holes or 3″ screws and glue.
STEP 3
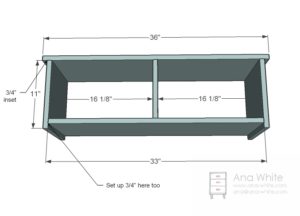
Box
If we are building a project that has storage in it, you are probably going to build a box. Screws and glue. 2″ ones will work just fine.
STEP 4
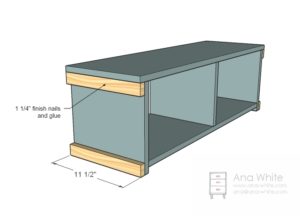
Trim
Trim out the box with 1 1/4″ finish nails and glue. This should be a super easy step.
STEP 5
STEP 6
Assembly
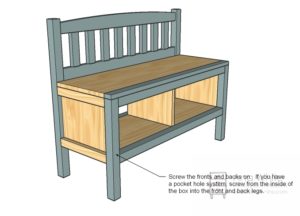
Now the fun part. Attach the front and back to the box with 3″ screws and glue.
Finishing Instructions
Now the work finished with High Gloss Paint from Valspar. Simply filled all of the holes and other imperfections with wood filler and let it dry. then try a second coat, then sanded with 120 grit sandpaper. A coat of primer and two coats of high gloss white and the bench is done! Enjoy.
