DIMENSIONS
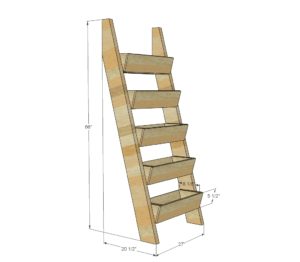
Dimensions are shown above.
PREPARATIONS
- 5 – 5-1/2″ wide cedar fence pickets (dogeared is fine) 72″ length
- 2 – 10′ long 2×6
- 20 – 2-1/2″ long exterior decking screws (for attaching boxes to legs)
- 1-1/4″ galvanized nails or staples (for making boxes)
- 10 – 2×6 @ 5-1/4″ both ends cut at 15 degrees off square, ends are NOT parallel
- 10 – 5-1/2″ wide cedar fence pickets @ 23-1/2″
- 5 – 5-1/2″ wide cedar fence pickets @ 20-1/2″ (cut to fit)
- 2 – 2×6 @ 68-3/8″ both ends cut at 15 degrees off square, ends ARE parallel
INSTRUCTIONS
STEP 1
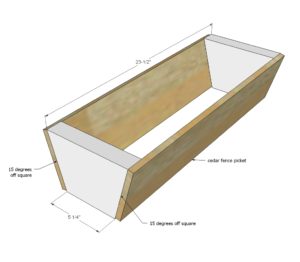
Attach two of the longer cedar fence picket pieces to two ends. I used 1-1/4″ galvanized staples, but you could also use screws or nails.
STEP 2
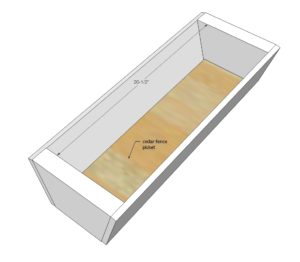
I placed the bottoms in from the top, and then added a few staples to keep them in place.
STEP 3
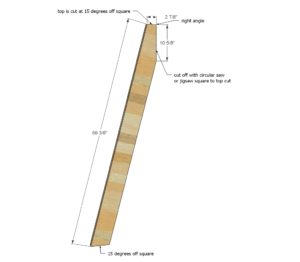
The sides are simply cut with ends parallel at 15 degrees, then the back is cut off perpendicular to the top 15-degree cut. It’s easier than you’d think. I used a jigsaw but the right tool would have been a circular saw. Start your cut on the top as you will have more to bit into.
STEP 4
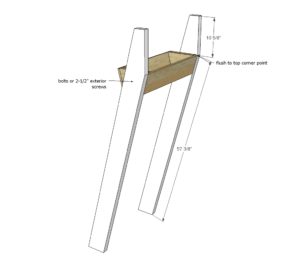
Mark the placement of the top planter on both legs first to make sure you place the planter in exactly the same spot on both legs. Then I attached from inside with 2-1/2″ exterior decking screws. The 2x6s I used were very hard to drill into, so I ended up predrilling as well.
STEP 5
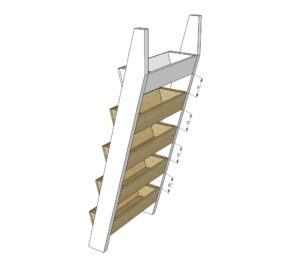
FINISHING INSTRUCTIONS
Fill all holes with wood filler and let dry. Apply additional coats of wood filler as needed. When wood filler is completely dry, sand the project in the direction of the wood grain with 120 grit sandpaper. Vacuum sanded project to remove sanding residue. Remove all sanding residue on work surfaces as well. Wipe project clean with a damp cloth.
It is always recommended to apply a test coat on a hidden area or scrap piece to ensure color evenness and adhesion. Use primer or wood conditioner as needed.
CREDIT ANA WHITE
