DIMENSIONS
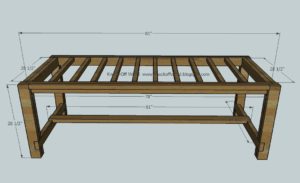
PREPARATION
SHOPPING LIST
- 8 – 2×4 8 feet long
- 6 – 2x2s 8 feet long
- 1 – 2×8 8 feet long
- 7 – 2x6s 8 feet long
- 2 3/4″ Self Tapping Wood Screws (About 100) (try spax brand or similar)
- 4″ Self-tapping wood Screws (About 20)
- 4 – 2×4 @ 28 1/2″ (Outside Legs)
- 4 – 2×4 @ 28 1/2″ (Inside Legs)
- 2 -2×4 @ 34 1/2″ (Bottom End Supports for the Stretcher)
- 1 – 2×4 @ 81″ (Stretcher)
- 2 – 2×4 @ 81″ (Side Aprons)
- 2 – 2×4 @ 28 1/2″ (End Aprons)
- 2 – 2×2 @ 28 1/2″ (Overhang Supports, Ends)
- 2 – 2×2 @ 78″ (Overhang Supports, Sides)
- 10 – 2×2 @ 28 1/2″ (Under Tabletop Supports)
- 2 – 2×8 @ 38 1/2″ (Breadboard Ends)
- 7 – 2×6 @ 81″ (Tabletop Pieces)
INSTRUCTIONS
STEP 1
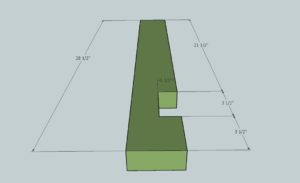
Notch out boards A, the Outside Legs, as shown above. If you do not know how to notch out boards, watch me notch the boards out for my table in my HOW-TO section.
STEP 2
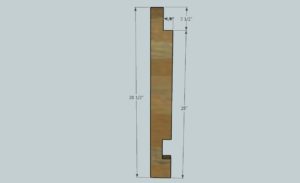
Notch out the inside leg as shown above. Make sure you notch both the top and the bottom as shown above. Use the measurements from step 2 to notch the bottom. See the below diagram for a closeup on notching the top.
STEP 3
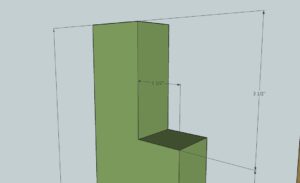
The above diagram show you how to notch out the top of the inside legs.
STEP 4
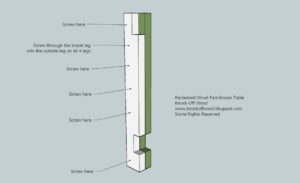
Now screw an inside leg to an outside leg, using glue and 2 3/4″ screws. Be aware of where each leg is placed – it does matter on what sides the inside leg sits. Also, screw through the inside leg into the outside leg to keep your screw holes on the inside.
STEP 5
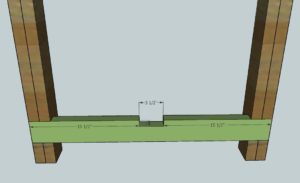
STEP 6
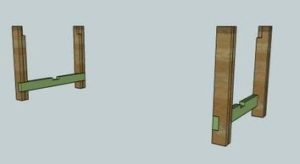
Screw the support, C, into the legs, as shown above. Make sure you use 2 screws on the inside leg and 2 screws on the outside legs per side of the end supports. NOTE: If you would like the support to be on the outside, rotate the legs, keeping the inside legs on the inside, and add 4″ to your stretcher, D. This will reduce your leg room for end chairs, but the notch out will be more visible, like my table and the Restoration Hardware table.
STEP 7
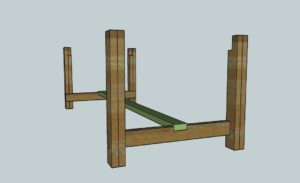
Put your stretcher in place and screw down.
STEP 8
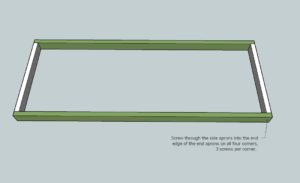
Build your apron on a level surface as shown above, using side apron boards E and end apron boards.
STEP 9
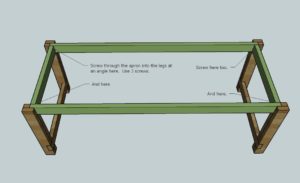
Fit the apron frame into the base of the table as shown above. Use the long screws to screw at an angle through the apron into the legs. Use 3 screws per leg on all legs. Lots of glue here. Now is a good time to check your table for square. Visit the HOW-TO section if you do not know how to check for square.
STEP 10
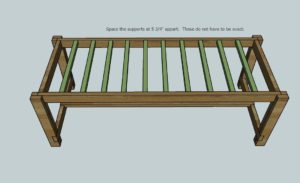
Mark the side apron every 5 3/4″ and place the 2×2 supports, I, as shown above. Remember that a 2×2 is 1 1/2″ wide. This does not have to be exact and the last support will not be exactly 5 3/4″ from the end. Use the 2 3/4″ screws here.
STEP 11
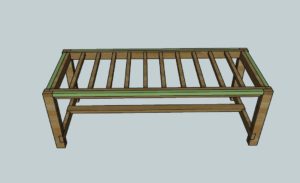
Add the overhang supports, G and H, as shown above. Keep the top edges flush, use the 2 3/4″ screws. Make sure you screw these in good.
STEP 12
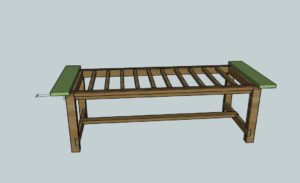
Now the breadboard ends, J. See the below diagram for measurements:
STEP 13
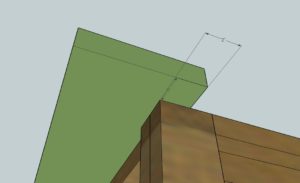
Use the long screws to screw the breadboard end into the legs. Then screw from the underside of the overhang support, board G, into the underside of the breadboard end.
STEP 14
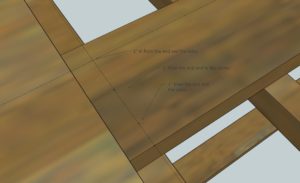
First mark all the ends of the tabletop boards, K, for the screw pattern. The screw pattern I used was 1″ from the end, and 1″ from each side and one in the middle. Predrill the ends on the marked pattern, as shown above.
STEP 15
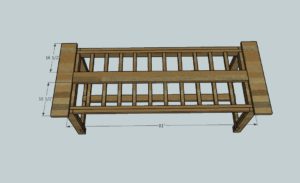
Then begin adding the tabletop pieces K, starting with the center piece. Screw the center board in place on the ends through the top, pre,drilled and marked in step 15. Then from the underside of the table, screw through the tabletop supports, I, into the underside of the tabletop boards, K.
STEP 16
Add the next tabletop boards, K, as shown below. As you screw each board down, take special care to line up the edges with the existing boards. You do not want a gap between the boards on the tabletop. Remember to screw through the top on the ends and then screw through the bottom of the under supports to the underside of the tabletop boards.
After all the boards are screwed in place, then use the long screws to screw through the tabletop boards into the breadboard ends, as shown above.
FINISHING INSTRUCTIONS
Fill any wood screw holes with wood filler. Use stain matched wood filler for best stain hiding. For a painted finish, any wood filler works. Overfill the screw holes. Let dry.
Sand the entire table with 120 grit sandpaper, working in the direction of the wood grain.
Refill holes with wood filler if needed.
Sand table with 180 grit sandpaper.
Stain or paint. If the table feels rough between coats, lightly sand with 180 grit sandpaper.
A final coat of poly on the top can help keep the top easy to finish and wipe cleanable.
CREDIT ANA WHITE
