Build your own washer and dryer pedestal bases to bring your laundry up in height. Also includes storage for baskets. You’ll love the step by step diagrams and cut list.
DIMENSIONS
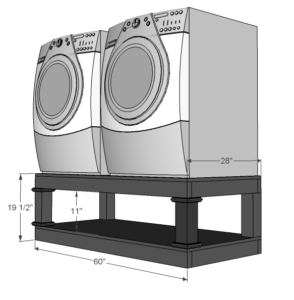
- 2 – sheet of 3/4″ MDF or Plywood
- 5 – 2×4 @ 8 feet long
- 1 – 4×4 post @ 4 feet long (you can also use 2x4s laminated together – just add another 2×4 to your list)
- 1 – stick of base cap moulding like this @ 6 feet long and 1″ brad nails for attaching
- 4 – Angle Brackets (like these)
- 3″ self tapping wood screws
- 2″ self tapping wood screws
- 10 – 2×4 @ 25″ (Joists)
- 4 – 2×4 @ 60″ (Sides of Floor)
- 2 – 3/4″ Plywood or MDF @ 28″ x 60″ (Decking)
- 4 – 4×4 Posts (or 8 2x4s) @ 11″ (Posts)
- Moulding cut to fit
INSTRUCTIONS
STEP 1
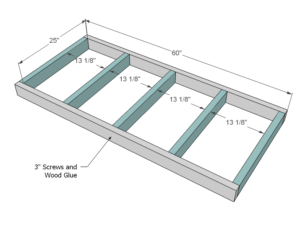
Floors
You are basically going to build two mini floors for this project. The top floor need to be built as shown above.
The bottom floor you can skip the center joists (minimal weight on bottom shelf)
Use glue and 3″ self tapping screws to build the framing. You can also use pocket holes if you have a Kreg Jig, on the 1-1/2″ setting with 2-1/2″ pocket hole screws.
STEP 2
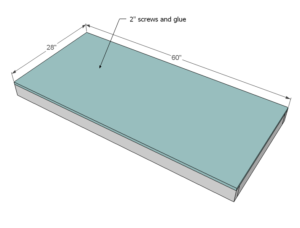
Decking
Screw the plywood to the top of the 2x4s with glue.
STEP 3
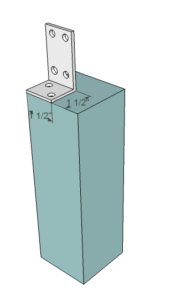
Corner Angles
This step is just because I have an old school washer and dryer that stomps out of the laundry room whenever I overloaded it. But the angles are cheap and will make your life easier. Screw down with 2″ screws.
STEP 4
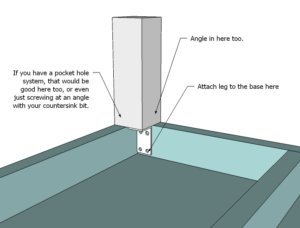
Attach Legs
Attach the legs to the top (the floor with the center supports) and screw down. If you can, add a few screws at an angle in as well.
STEP 5
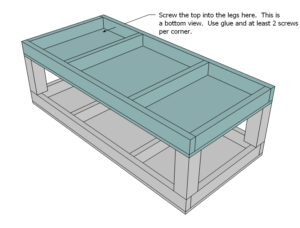
Place the second “floor” on the 4x4s and screw through the 3/4″ plywood into the undersides of the 4×4 legs. At least three screws per leg is recommended.
STEP 6
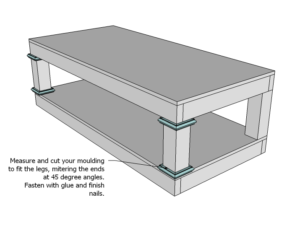
Trim
Cut trim to fit and attach around legs to fancy up the base (optional)
STEP 7
Additional Bracing
If you find your base needs more support here are a few quick fixes –
- Cover the entire back in 3/4″ plywood or MDF scraps from the build, glue and screw every 4″ approximately to the 4×4 legs and the 2×4 framing with 3″ self-tapping screws.
- Attach the 2x4s framing to studs in the walls
FINISHING INSTRUCTIONS
Sausha trimmed everything out with another layer of MDF. If you are good with a table saw this can really give you that finished look. Otherwise, I recommend patience and a whole tub of wood filler. More details on Sausha’s finish here.
CREDIT ANA WHITE
