Free plans to build your own industrial farmhouse table.
DIMENSIONS
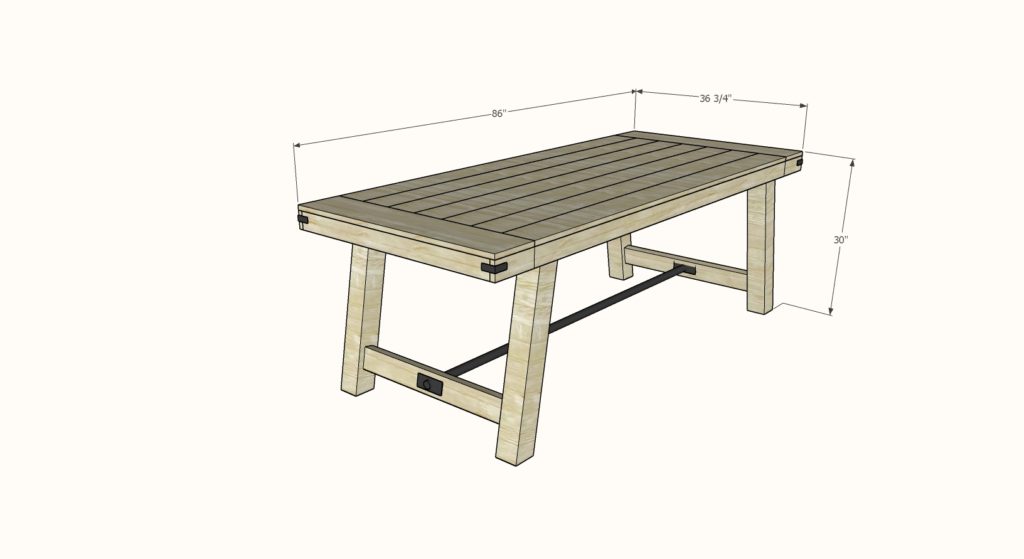
Seats 8, dimensions are shown in the diagram.
PREPARATIONS
- 7 – 1×6 @ 6 feet long (rip down to 5-1/4″ width, both edges are ripped square)
- 1 – 1×8 @ 8 feet long
- 3 – 1×4 @ 8 feet long (rip down to 2-3/4″ width, one edge is still rounded) OR use select pine 1x3s with square edges
- 2 – 2×3 @ 8 feet long or stud length
- 1 – 2×4 @ 8 feet long or stud length
- 72″ overall of iron pipe (can use unions or turnbuckles) with end nuts
- 100 – 1-1/4″ pocket hole screws
- 25 – 2-1/2″ pocket hole screws
- 20 – 2″ self tapping cabinet screws
- wood glue
Tabletop
- 7 – 1×6 @ 72″ – rip both edges down to 5-1/4″ wide
- 2 – 1×8 @ 36-3/4″ *
- 2 – 1×4 ripped top edge down to 2-3/4″ width (or use select pine in 1×3 width with square edges) @ 86″ *
- 2 – 1×4 ripped top edge down to 2-3/4″ width (or use select pine in 1×3 width with square edges) @ 35-1/4″ *
Base
- 4 – 4×4 @ 29-3/4″ – long point to short point, both ends cut at 10 degrees off square, ends are parallel
- 2 – 2×3 @ 28-1/4″ *
- 2 – 2×4 @ 28-1/4″ *
- 2 – 2×3 @ 60″ – long point to long point measurement, both ends cut at 10 degrees off square, ends NOT parallel
INSTRUCTIONS
STEP 1
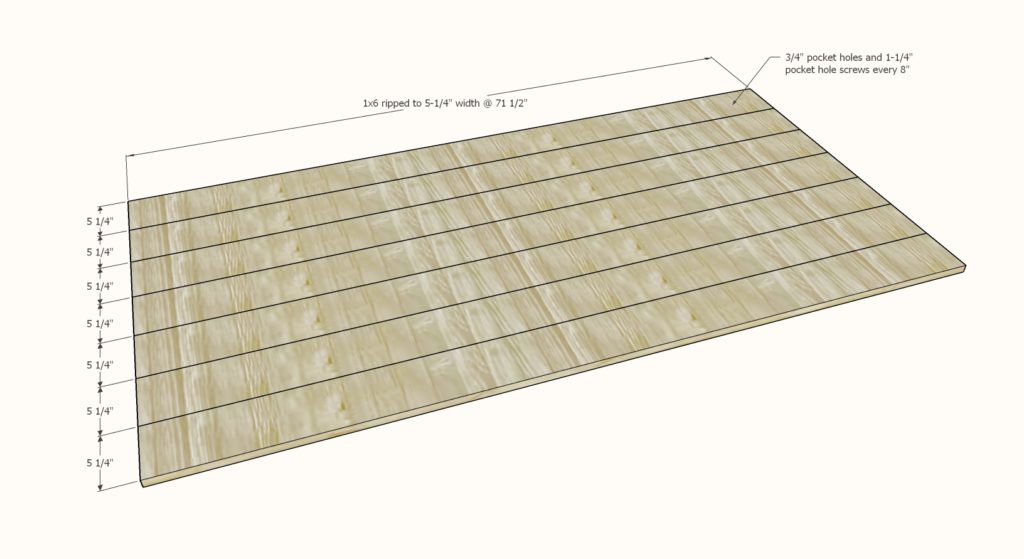
Rip rounded edges off of the 1x6s with a final width of 5-1/4″.
Drill 3/4″ pocket holes every 8″ along long edge of all but one of the 1×6 boards.
Glue, clamp and attach, 1-1/4″ pocket hole screws.
Cut ends square so final tabletop length is 71-1/2″.
NOTE: If you are adjusting the overall length of the table, the tabletop boards should equal the length of your pipe.
STEP 2
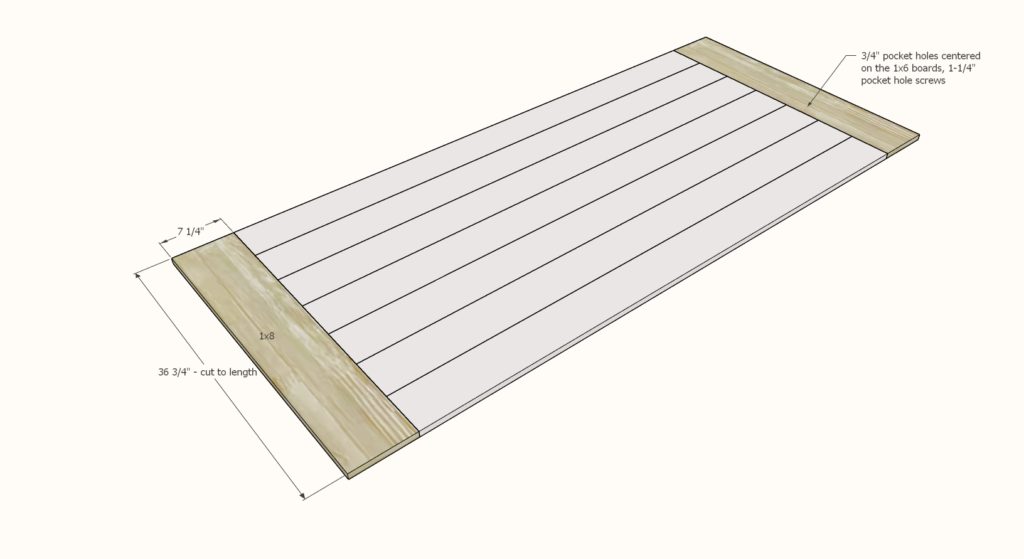
Measure and cut the 1×8 breadboard ends.
Mark location of pocket holes on 1x8s and drill 3/4″ pocket holes.
Attach 1x8s to tabletop with 1-1/4″ pocket hole screws and wood glue.
STEP 3
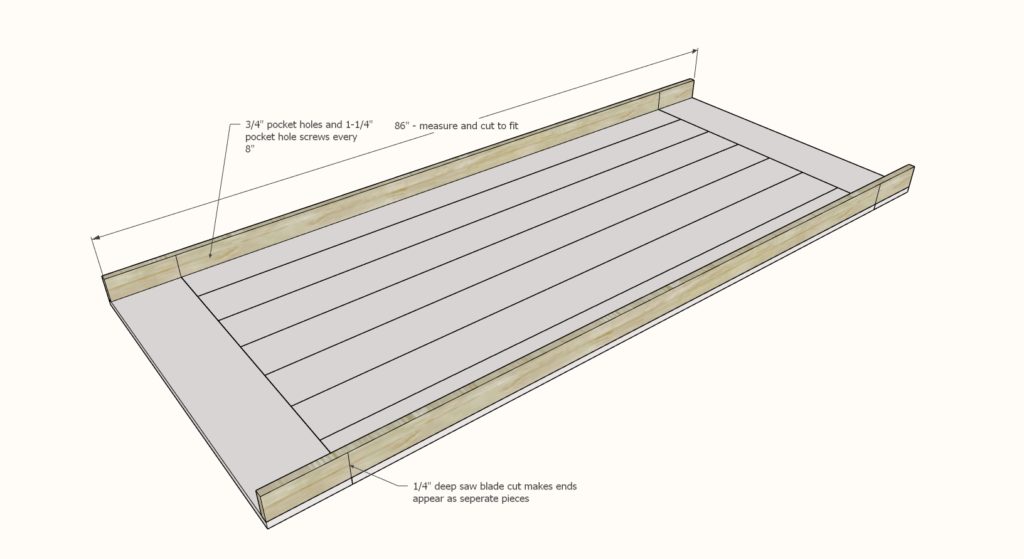
Rip 1x4s down to 2-3/4″ width (one edge should be cut square, bottom edge can be rounded).
Drill 3/4″ pocket holes facing upward along one edge, every 8″.
Attach to underside of the tabletop with 1-1/4″ pocket hole screws and wood glue.
For the false cuts, you can use a square to score the wood with a razor knife or chisel or use a circular saw with the blade set to about 1/8″ deep.
*If using select pine or other wood with square edges, you can use 1x3s here and not rip.
STEP 4
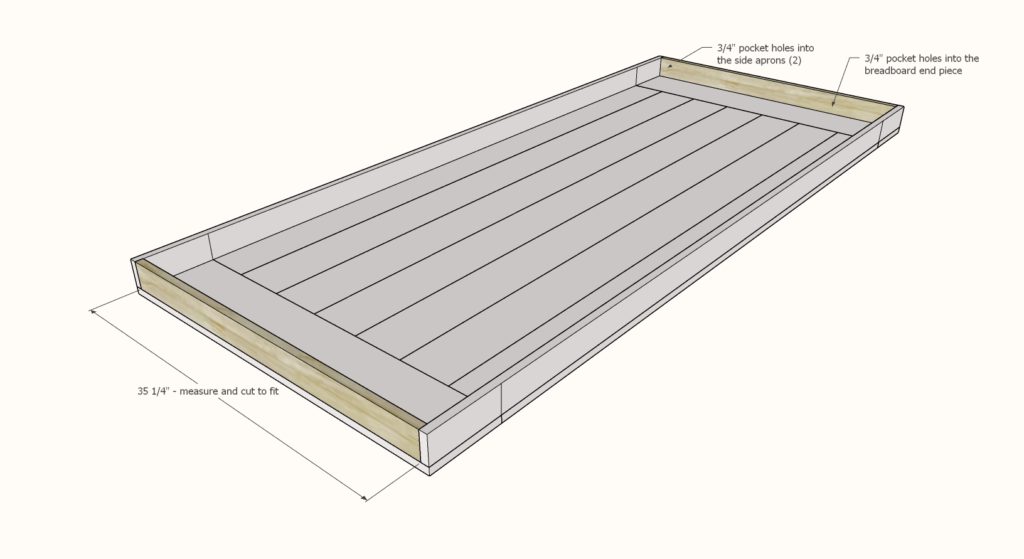
Measure and cut the end aprons.
Drill 3/4″ pocket holes both facing upward and to attach to the side aprons.
Attach with 1-1/4″ pocket hole screws and glue.
Set tabletop aside on a flat level surface to dry.
STEP 5
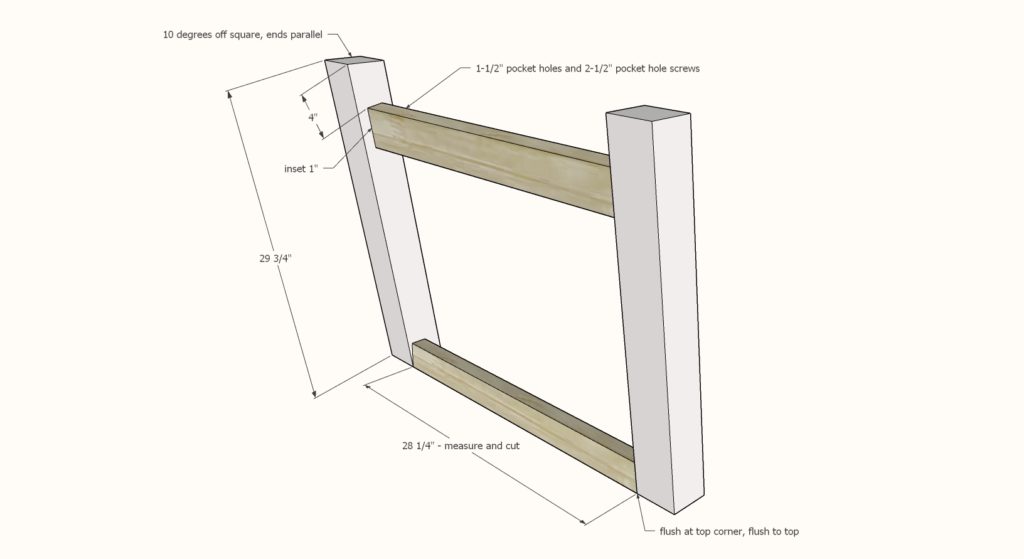
Set miter saw to 10 degree angle cut off square.
Cut the legs, ends are parallel, 29-3/4″ short point to long point measurement.
Cut the 2×3 and 2×4 end aprons and stretcher pieces so that the legs and 2×3 apron fit inside the tabletop. Dryfit.
Set Kreg Jig to 1-1/2″ material.
Drill 1-1/2″ pocket holes, two per end, on the 2×3 and 2x4s.
Attach as shown in diagram to the 4×4 legs with 2-1/2″ pocket hole screws.
It worked best for me to attach both to one leg first, then flip and attach both to the other leg, using gravity to help me.
STEP 6
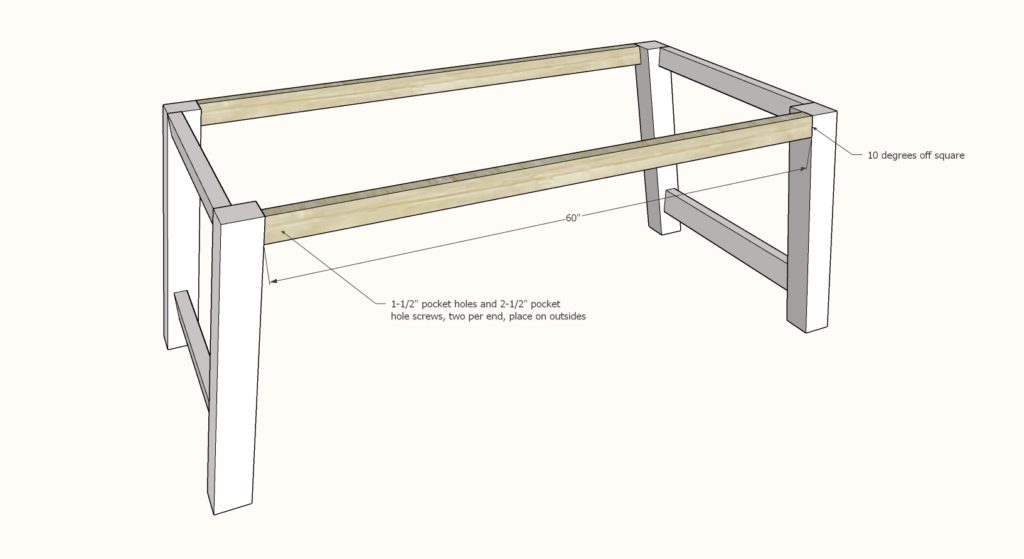
Drill two 1-1/2″ pocket holes on each end of the 2×3 inside aprons.
Attach to the 4×4 legs with 2-1/2″ pocket hole screws and glue.
STEP 7
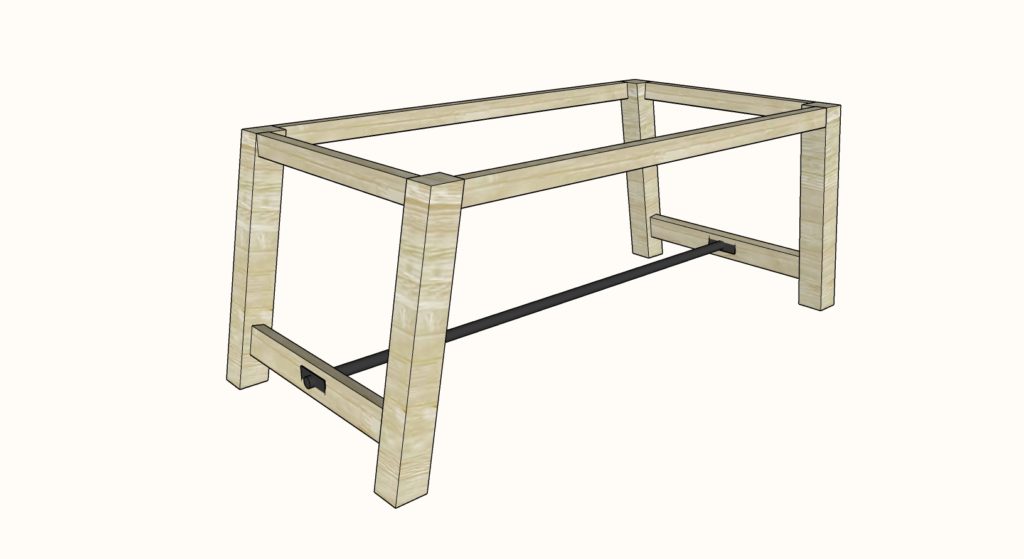
Drill holes centered in the 2×4 stretcher slightly larger than the outside pipe diameter. I used a forstner bit.
Thread pipe through and tighten.
STEP 8
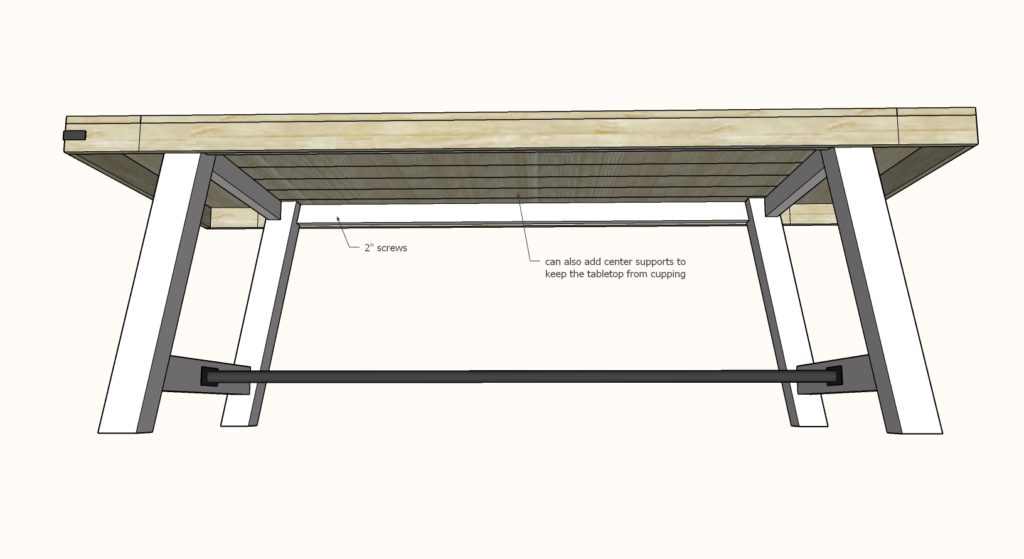
Place tabletop on top of the base.
Attach from inside with 2″ screws and glue.
You can also add additional 1×3 supports to further strengthen the underside of the table with pocket holes, so the 1×3 is attached to both the underside of the tabletop and the 2×3 side aprons.
