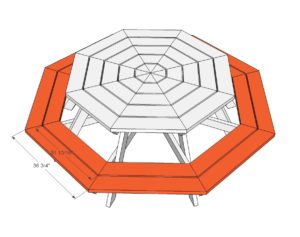
Our octagon picnic table plans are free and easy to follow. Extending to eight feet wide, perfect for a large backyard BBQ. Tabletop is 64″ wide. It’s a big one!
DIMENSIONS
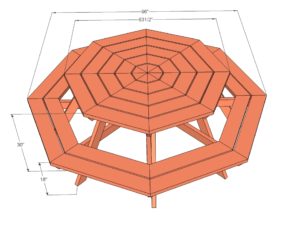
Dimensions are shown above. This table is LARGE. And it will be heavy.
PREPARATIONS
- 10 – 2×4 @ 8 feet long
- 15 – 2×6 @ 8 feet long
- 2 1/2 inch screws
- 2-1/2″ Pocket Hole Screws
- Elmer’s Wood Glue
- Elmer’s Wood Filler
- 120 grit sandpaper
- primer
- wood conditioner
- paint
- paintbrush
- 1 – 2×4 @ 62″ (Longest Point – Both ends tapered back at 30 degrees off square, NOT parallel to each other)
- 2 – 2×4 @ 30 1/2″ (Longest Point – One end at 30 degrees off square)
- 4 – 2×4 @ 29 15/16″ (Longest Point – One end at 30 degrees off square, other end at a point, 45 degrees off square)
- 8 – 2×6 @ 4 9/16″ (Longest Point – Both ends at 22 1/2 degrees off square)
- 8 – 2×6 @ 9 1/2″ (Longest Point – Both ends at 22 1/2 degrees off square)
- 8 – 2×6 @ 14 7/16″ (Longest Point – Both ends at 22 1/2 degrees off square)
- 8 – 2×6 @ 19 5/16″ (Longest Point – Both ends at 22 1/2 degrees off square)
- 8 – 2×6 @ 24 1/4″ (Longest Point – Both ends at 22 1/2 degrees off square)
- 8 – 2×6 @ 32 15/16″ (Both ends at 30 degrees off square, parallel to each other)
- 1 – 2×4 @ 95″ (Longest Point – Both ends tapered in at 30 degrees off square)
- 2 – 2×4 @ 46 3/4″ (Longest Point – One end at 30 degrees off square)
- 4 – 2×4 @ 46 7/16″ (Longest Point – One end at 30 degrees off square, other end at a point, 45 degrees off square)
- 8 – 2×6 @ 31 13/16″ (Longest Point – Both ends at 22 1/2 degrees off square)
- 8 – 2×6 @ 36 3/4″ (Both ends at 30 degrees off square, parallel to each other)
INSTRUCTIONS
STEP 1
I wanted to add a diagram so that you can take measurements of the legroom.
STEP 2
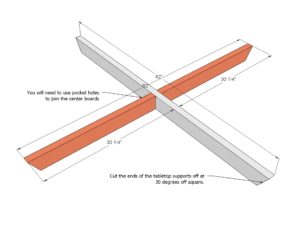
It starts with a big X. Be sure you are working on a very flat, level surface. Use pocket hole screws and glue to joint in the center as shown above. You could also use metal straps or plates but you can only place the metal plates on the bottom side.
STEP 3
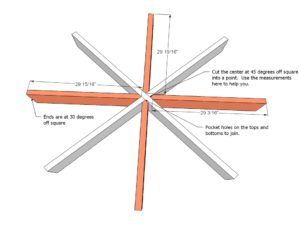
You will then need to carefully cut the remaining supports as shown above (click for a larger view) and add, with 22 1/2 degree angles between the “spokes”. Pocket holes or metal brackets.
STEP 4
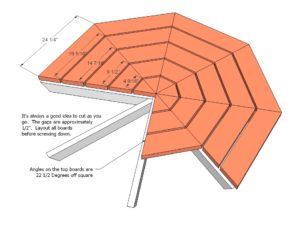
Layout all of the tabletop boards first and adjust as necessary. The tabletop boards should meet in the center of the “spokes”. Screw down, two screws per board, predrilled.
STEP 5
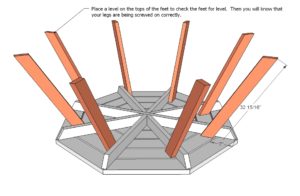
STEP 6
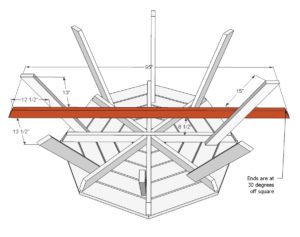
Mark all of your legs as shown above. Start by adding the longest remaining support as shown above. TIP: For added strength, rotate the full-length support to 90 degrees from the full-length tabletop support. This is shown incorrectly above.
STEP 7
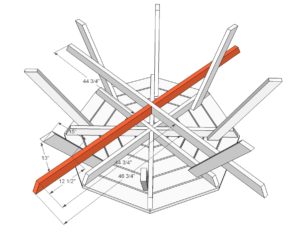
Then add the two supports cut straight on one end as shown above.
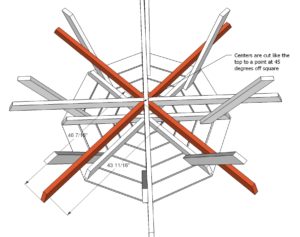
It is always recommended to apply a test coat on a hidden area or scrap piece to ensure color evenness and adhesion. Use primer or wood conditioner as needed.

