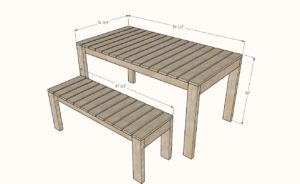
Build your outdoor table! We love the simple styling and clean lines of this outdoor table. This simple plan requires no special tools and is beginner-friendly! Build and enjoy this weekend!
DIMENSIONS

Overall Dimensions are shown above.
PREPARATIONS
- 4 – 2×4 @ 8 feet long (cut longest boards first)
- 5 – 1×4 @ 8 feet long
- 100 – 1-1/4″ to 2″ long – self-tapping exterior screws (look for star bit ones)
- 25 – 2-1/2″ long self-tapping exterior screws
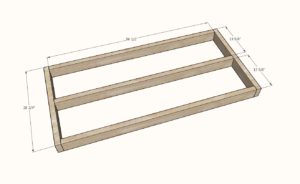
- 3 – 2×4 @ 56-1/2″ – frame
- 2 – 2×4 @ 28-3/4″ – frame ends
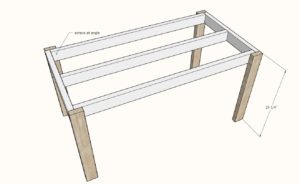
- 4 – 2×4 @ 29-1/4″ – legs
- 15 – 1×4 @ 31-3/4″ – tabletop boards
INSTRUCTIONS
STEP 1

Build the frame of the table with the longer screws, two screws per joint.
Adjust for square by taking opposite diagonal measurements and adjusting until the opposite diagonals match.
STEP 2

Attach legs to the frame (will be the easiest upside down). Multiple screws at an angle into the legs will be stronger than screws straight on.
STEP 3

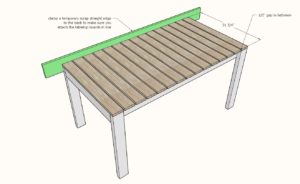
Clamp a straight edge to the outside of the table and layout the tabletop boards with a 1/2″ gap in between. Screw down with the shorter screws.
For the end boards, screw to the end of the frame too – this will add considerable strength to your table.
FINISHING INSTRUCTIONS
Fill all holes with wood filler and let dry. Apply additional coats of wood filler as needed. When wood filler is completely dry, sand the project in the direction of the wood grain with 120 grit sandpaper. Vacuum sanded project to remove sanding residue. Remove all sanding residue on work surfaces as well. Wipe project clean with a damp cloth.
It is always recommended to apply a test coat on a hidden area or scrap piece to ensure color evenness and adhesion. Use primer or wood conditioner as needed.
CREDIT ANA WHITE
