More info on the project
Vestibulum ac diam sit amet quam vehicula elementum sed sit amet dui. Donec sollicitudin molestie malesuada. Nulla porttitor accumsan tincidunt. Nulla quis lorem ut libero malesuada feugiat.
Vestibulum ac diam sit amet quam vehicula elementum sed sit amet dui. Lorem ipsum dolor sit amet, consectetur adipiscing elit. Pellentesque in ipsum id orci porta dapibus. Mauris blandit aliquet elit, eget tincidunt nibh pulvinar a.
Curabitur aliquet quam
Vivamus magna lacinia
Live performance
Et pretium aliquam sed vitae amet, id. At non dui aliquet in suspendisse.
Music video editing
Et pretium aliquam sed vitae amet, id. At non dui aliquet in suspendisse.
Digital content
Et pretium aliquam sed vitae amet, id. At non dui aliquet in suspendisse.
Welcome to Avada Productions
We are pioneers in the production of commercials and digital content
Share This Story, Choose Your Platform!
- 3 – 2×2 @ 8 feet long
- 1 – 1×12 @ 8 feet long
- 1 – 1×3 @ 8 feet long
- 1 ¼” and 2 ½” PH screws
- 2” nails or screws for attaching shelves
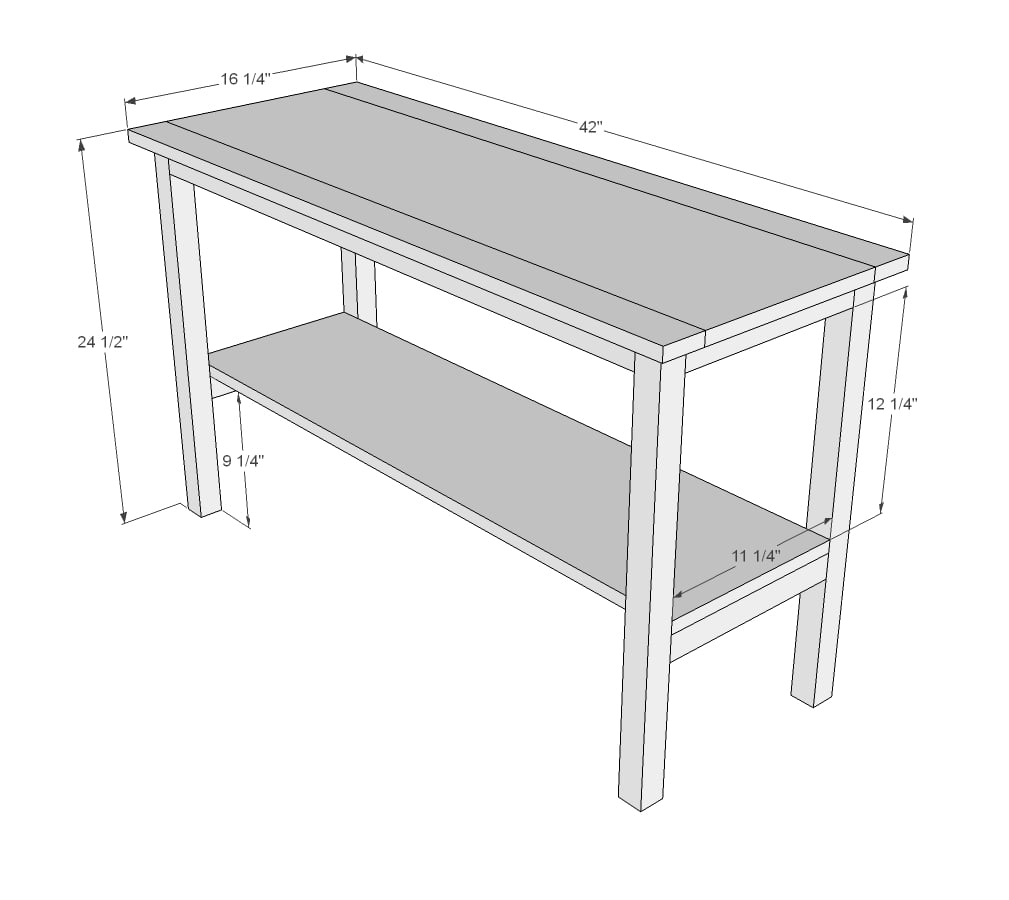
- 4 – 2×2 @ 23 3/4″
- 4 – 2×2 @ 11 1/4″ (cut these to the width of your 1×12, expected to be 11 1/4″)
- 3 – 2×2 @ 37”
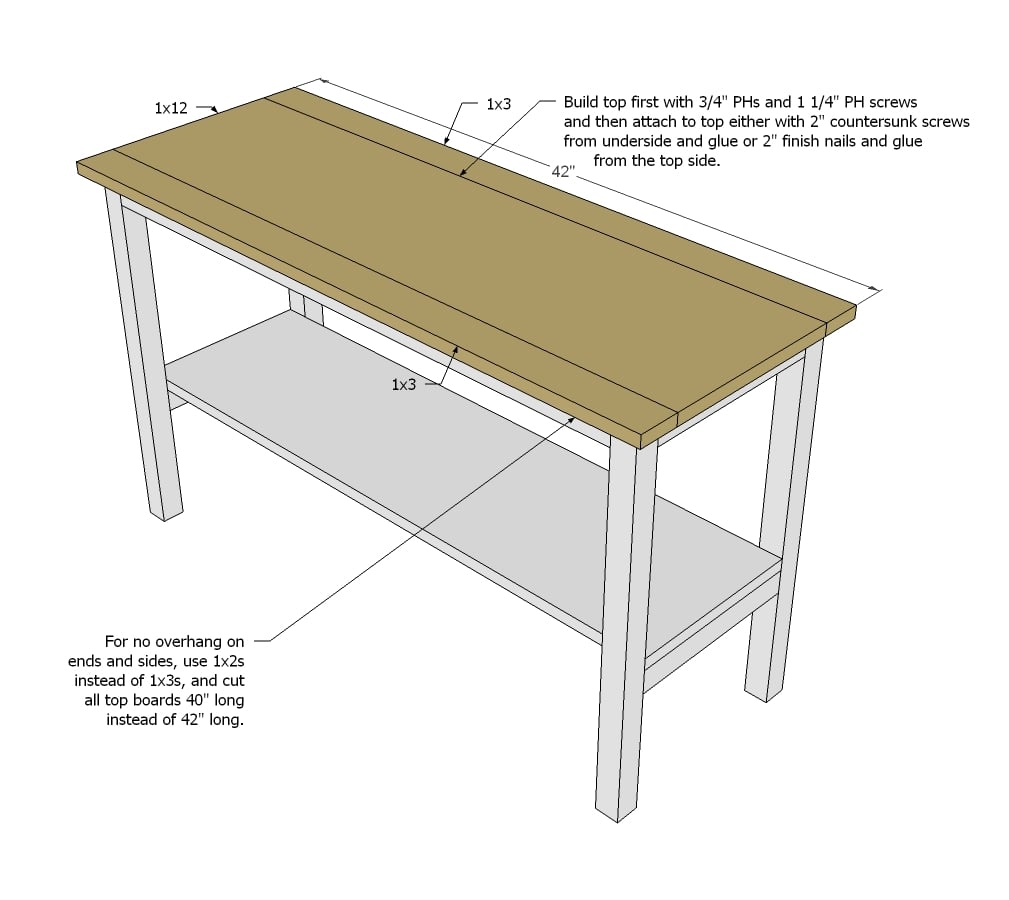
- 1 – 1×12 @ 40”
- 1 – 1×12 @ 42”
- 2 – 1×3 @ 42”
DIMENSIONS

INSTRUCTION
STEP 1
First build two of the legs.
STEP 2
Then join the two legs up with the side aprons and bottom support. The bottom support will make sure your bottom shelf doesn’t sag.
STEP 3
Now add your bottom shelf – super easy – just screw through the bottom supports into underside of shelf.
STEP 4
And then build your top first with 3/4″ PHs (pocket holes) and 1 1/4″ PH screws (pocket hole screws) and attach same as the bottom shelf. Note: Jen used 3/4″ plywood for her top instead – you can do that too!
FINISHING INSTRUCTIONS
Fill all holes with wood filler and let dry. Apply additional coats of wood filler as needed. When wood filler is completely dry, sand the project in the direction of the wood grain with 120 grit sandpaper. Vacuum sanded project to remove sanding residue. Remove all sanding residue on work surfaces as well. Wipe project clean with damp cloth.
It is always recommended to apply a test coat on a hidden area or scrap piece to ensure color evenness and adhesion. Use primer or wood conditioner as needed.
CREDIT ANA WHITE
DIMENSIONS

INSTRUCTION
STEP 1
First build two of the legs.
STEP 2
Then join the two legs up with the side aprons and bottom support. The bottom support will make sure your bottom shelf doesn’t sag.
STEP 3
Now add your bottom shelf – super easy – just screw through the bottom supports into underside of shelf.
STEP 4
And then build your top first with 3/4″ PHs (pocket holes) and 1 1/4″ PH screws (pocket hole screws) and attach same as the bottom shelf. Note: Jen used 3/4″ plywood for her top instead – you can do that too!
FINISHING INSTRUCTIONS
Fill all holes with wood filler and let dry. Apply additional coats of wood filler as needed. When wood filler is completely dry, sand the project in the direction of the wood grain with 120 grit sandpaper. Vacuum sanded project to remove sanding residue. Remove all sanding residue on work surfaces as well. Wipe project clean with damp cloth.
It is always recommended to apply a test coat on a hidden area or scrap piece to ensure color evenness and adhesion. Use primer or wood conditioner as needed.
CREDIT ANA WHITE
DIMENSIONS

INSTRUCTION
STEP 1
First build two of the legs.
STEP 2
Then join the two legs up with the side aprons and bottom support. The bottom support will make sure your bottom shelf doesn’t sag.
STEP 3
Now add your bottom shelf – super easy – just screw through the bottom supports into underside of shelf.
STEP 4
And then build your top first with 3/4″ PHs (pocket holes) and 1 1/4″ PH screws (pocket hole screws) and attach same as the bottom shelf. Note: Jen used 3/4″ plywood for her top instead – you can do that too!
FINISHING INSTRUCTIONS
Fill all holes with wood filler and let dry. Apply additional coats of wood filler as needed. When wood filler is completely dry, sand the project in the direction of the wood grain with 120 grit sandpaper. Vacuum sanded project to remove sanding residue. Remove all sanding residue on work surfaces as well. Wipe project clean with damp cloth.
It is always recommended to apply a test coat on a hidden area or scrap piece to ensure color evenness and adhesion. Use primer or wood conditioner as needed.
CREDIT ANA WHITE


